HaloITSM integration
HaloITSM platform that helps organizations manage incidents, service requests, and other IT service operations.
The integration with HaloITSM lets you automatically forward monitor alerts as tickets to your HaloITSM account. When a monitored resource changes status, a ticket is created or updated in HaloITSM, keeping your IT service management workflows aligned with real-time infrastructure health.
Key capabilities of the integration
This integration provides the following key functionalities:
- Forward monitor alerts as tickets directly to your HaloITSM account.
- Trigger ticket creation on specific monitor status changes such as Down, Trouble, Critical, or Problem and automatically add subsequent monitor status updates as comments to the corresponding ticket.
- Customize the ticket message title using dynamic variables such as $MONITORNAME and $STATUS, and use notification templates to customize the alert information sent to HaloITSM.
- View linked HaloITSM ticket details directly from the Alarm Details page.
- Notify the appropriate user groups if the integration fails.
Prerequisites
Before integrating with HaloITSM:
- You must have an active HaloITSM account and the Instance URL.
- Create an application in HaloITSM with the required permissions for ticket management.
- Obtain an API Key for API key authentication or the Client ID and Client Secret for OAuth authentication from HaloITSM.
Configuring the HaloITSM side of the integration
- Log in to your HaloITSM account.
- Navigate to Configuration > Integrations > Halo API.
- Click New Application to create a new application.
- In the Application Name, enter a recognizable name (for example, Integration with S247 ).
- Under Authentication Method, configure one of the following authentication methods:
- API Key:
- Select API Key. Grant the application the permissions required for ticket management (create, read, and update).
- Save the application. HaloITSM generates an API Key.
Copy and securely store the API Key. You will need it to configure the credential profile for the integration.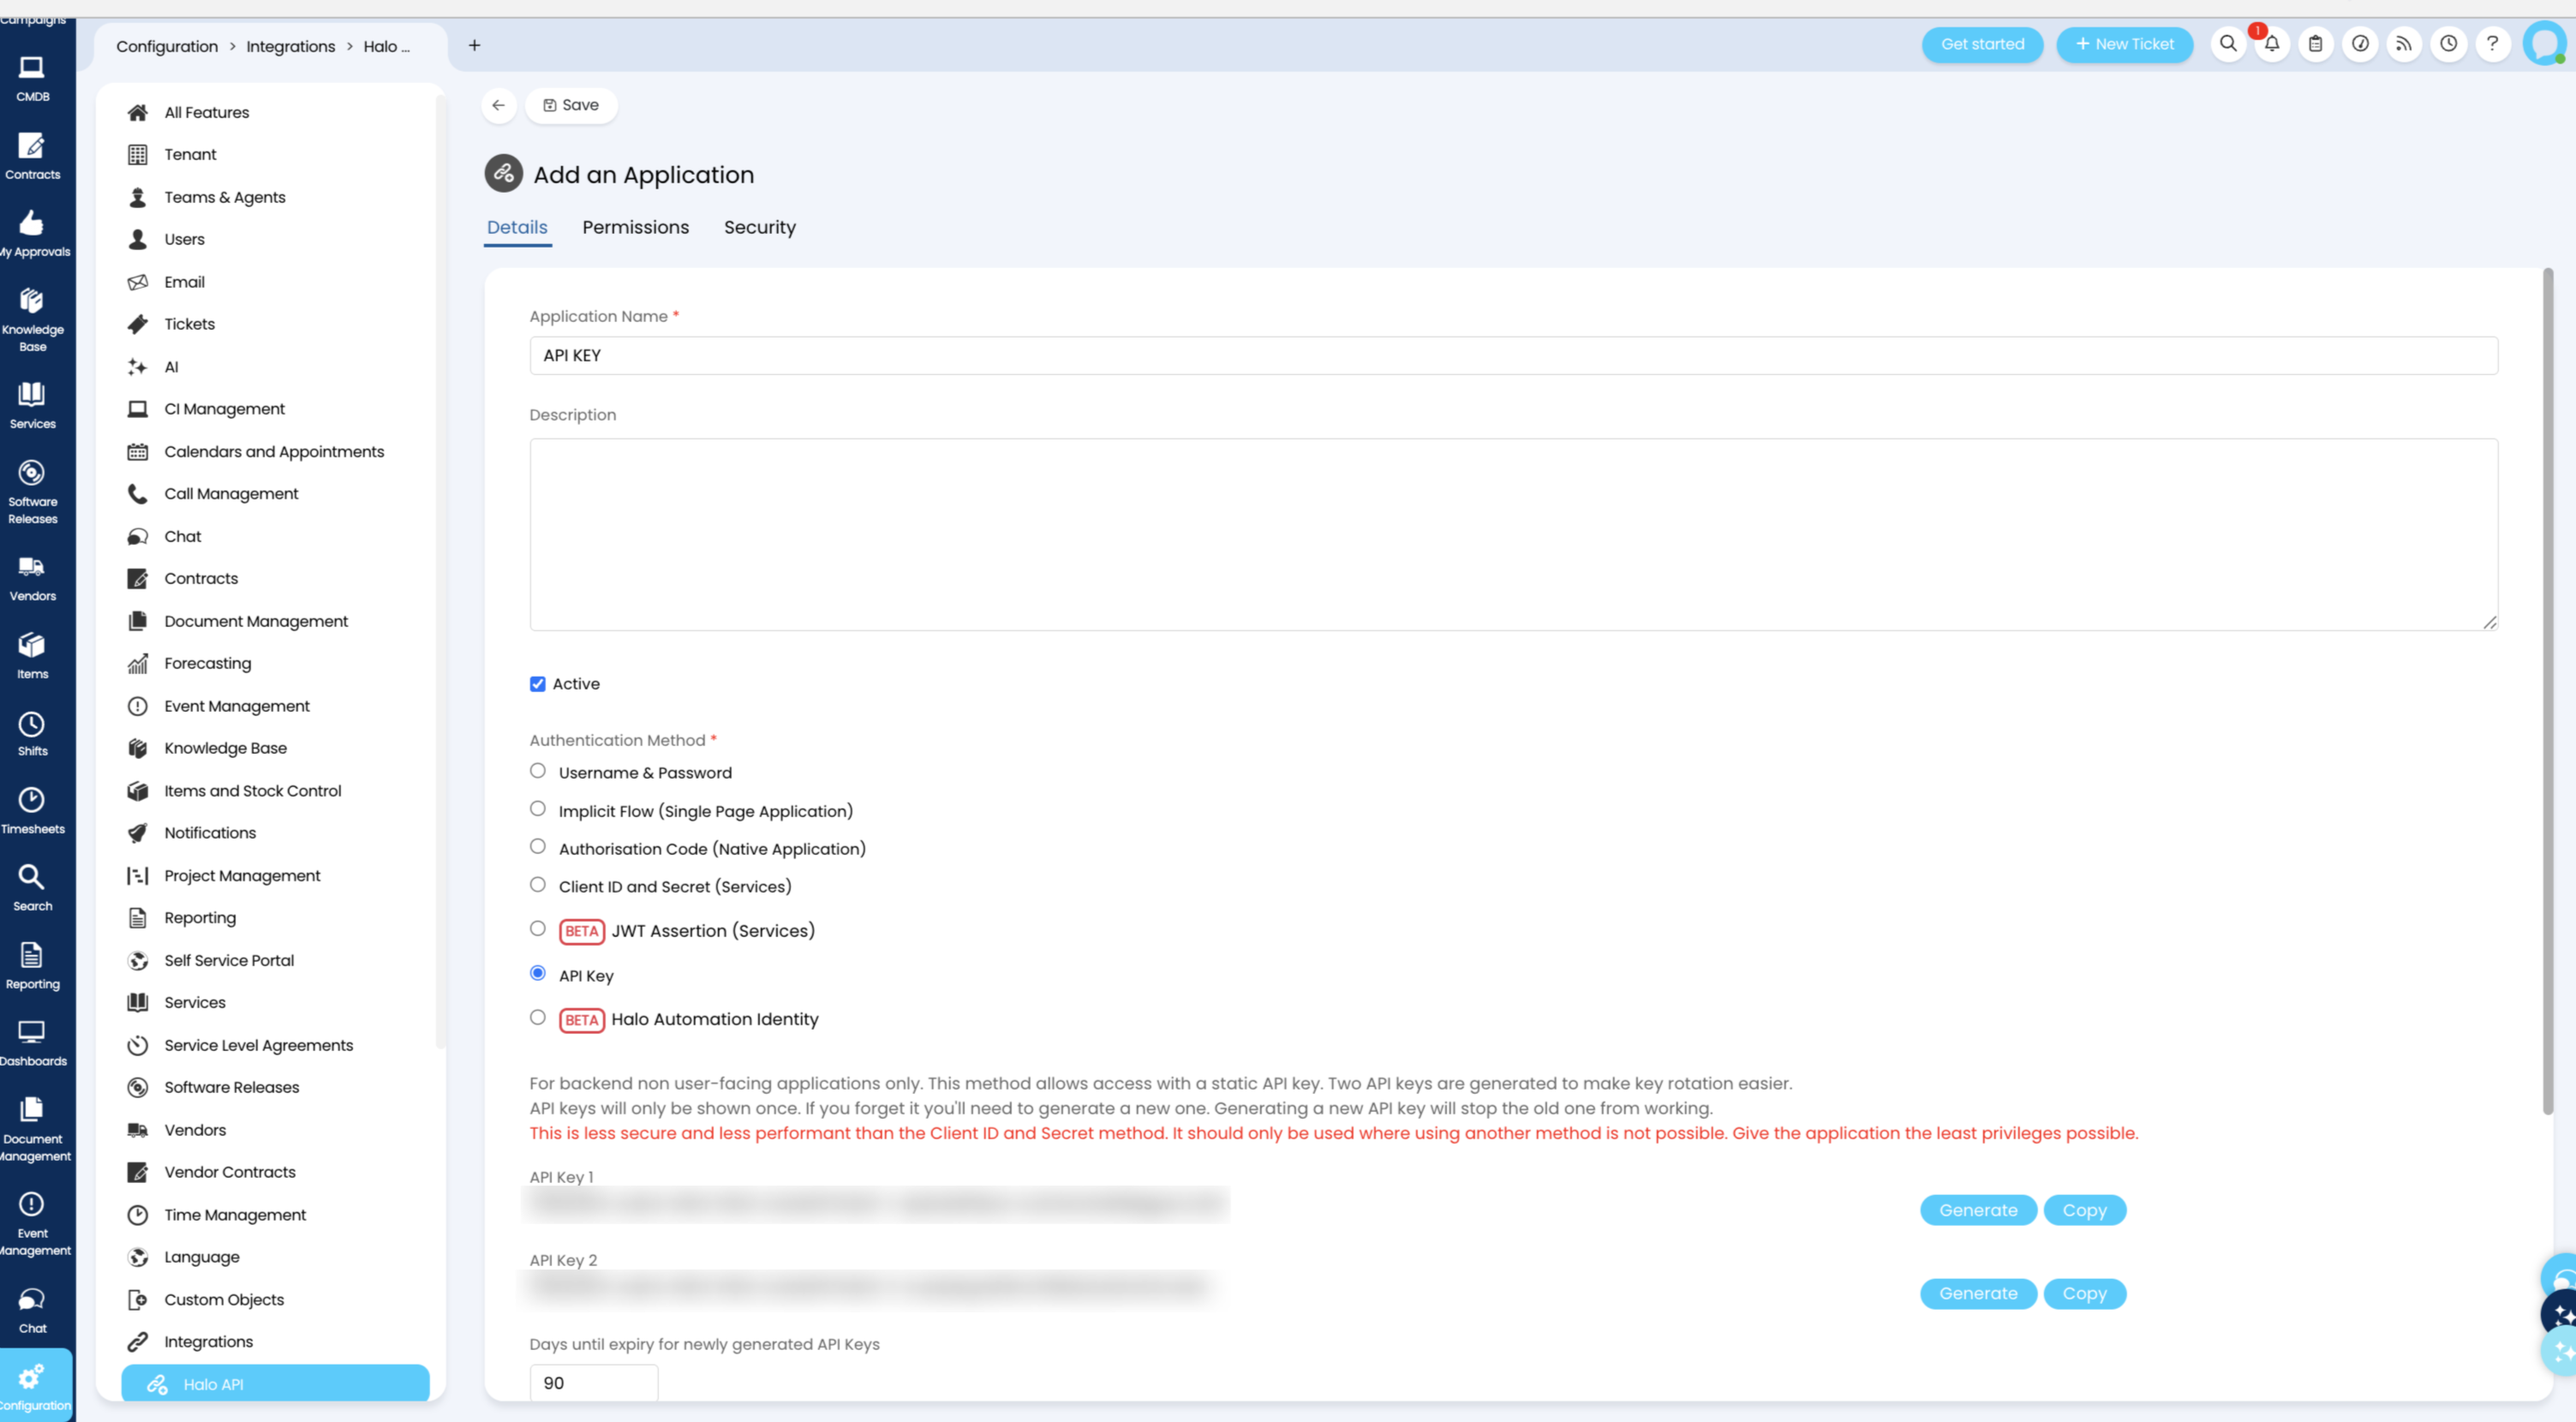
- OAuth:
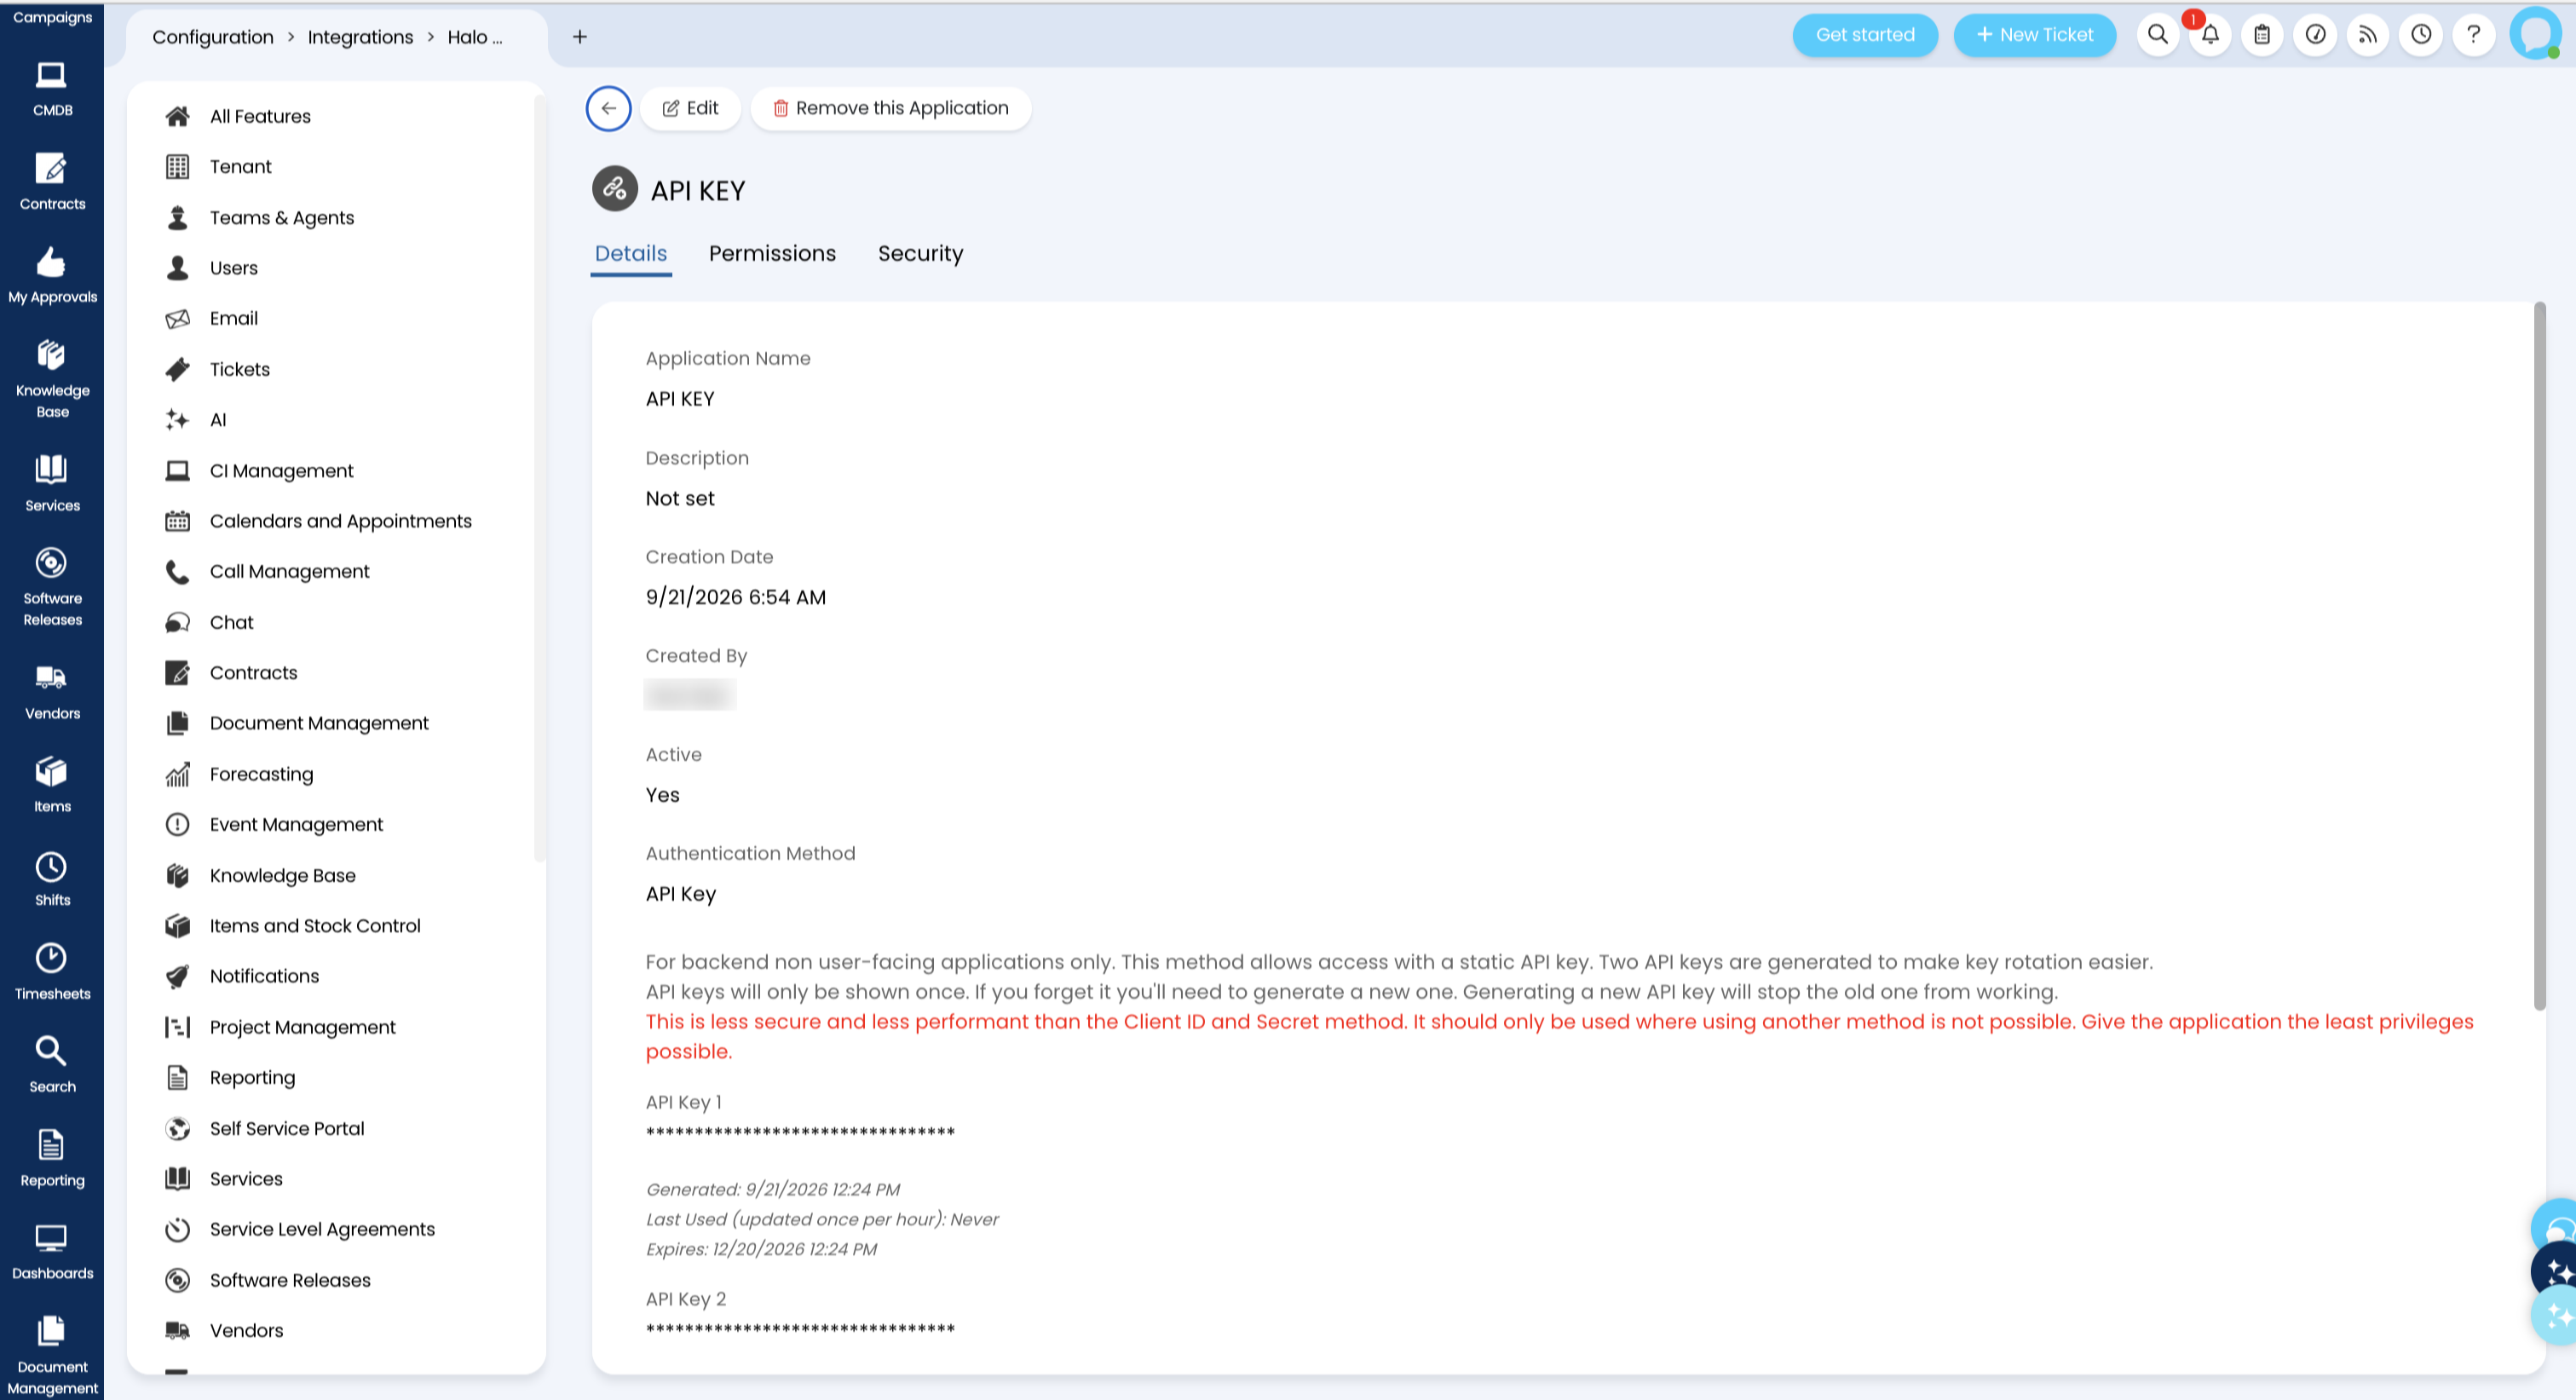
- Select Authorisation Code (Native Application).
- Configure the required permissions for ticket management (create, read, and update).
- Click Save. HaloITSM generates a Client ID and Client Secret.
Copy and securely store the Client ID and Client Secret. You will need them to configure the OAuth provider for the integration.
- API Key:
- Copy your HaloITSM Instance URL (for example, https://your-subdomain.haloservicedesk.com). You will need the Instance URL while configuring the integration.
Keep your API Key, Client ID, and Client Secret secure and do not share it with anyone.
Configuring the monitoring application side of the integration
- Log in to this platform.
- Navigate to Admin > Third-Party Integrations > HaloITSM.
- Provide the following details in the integrations form:
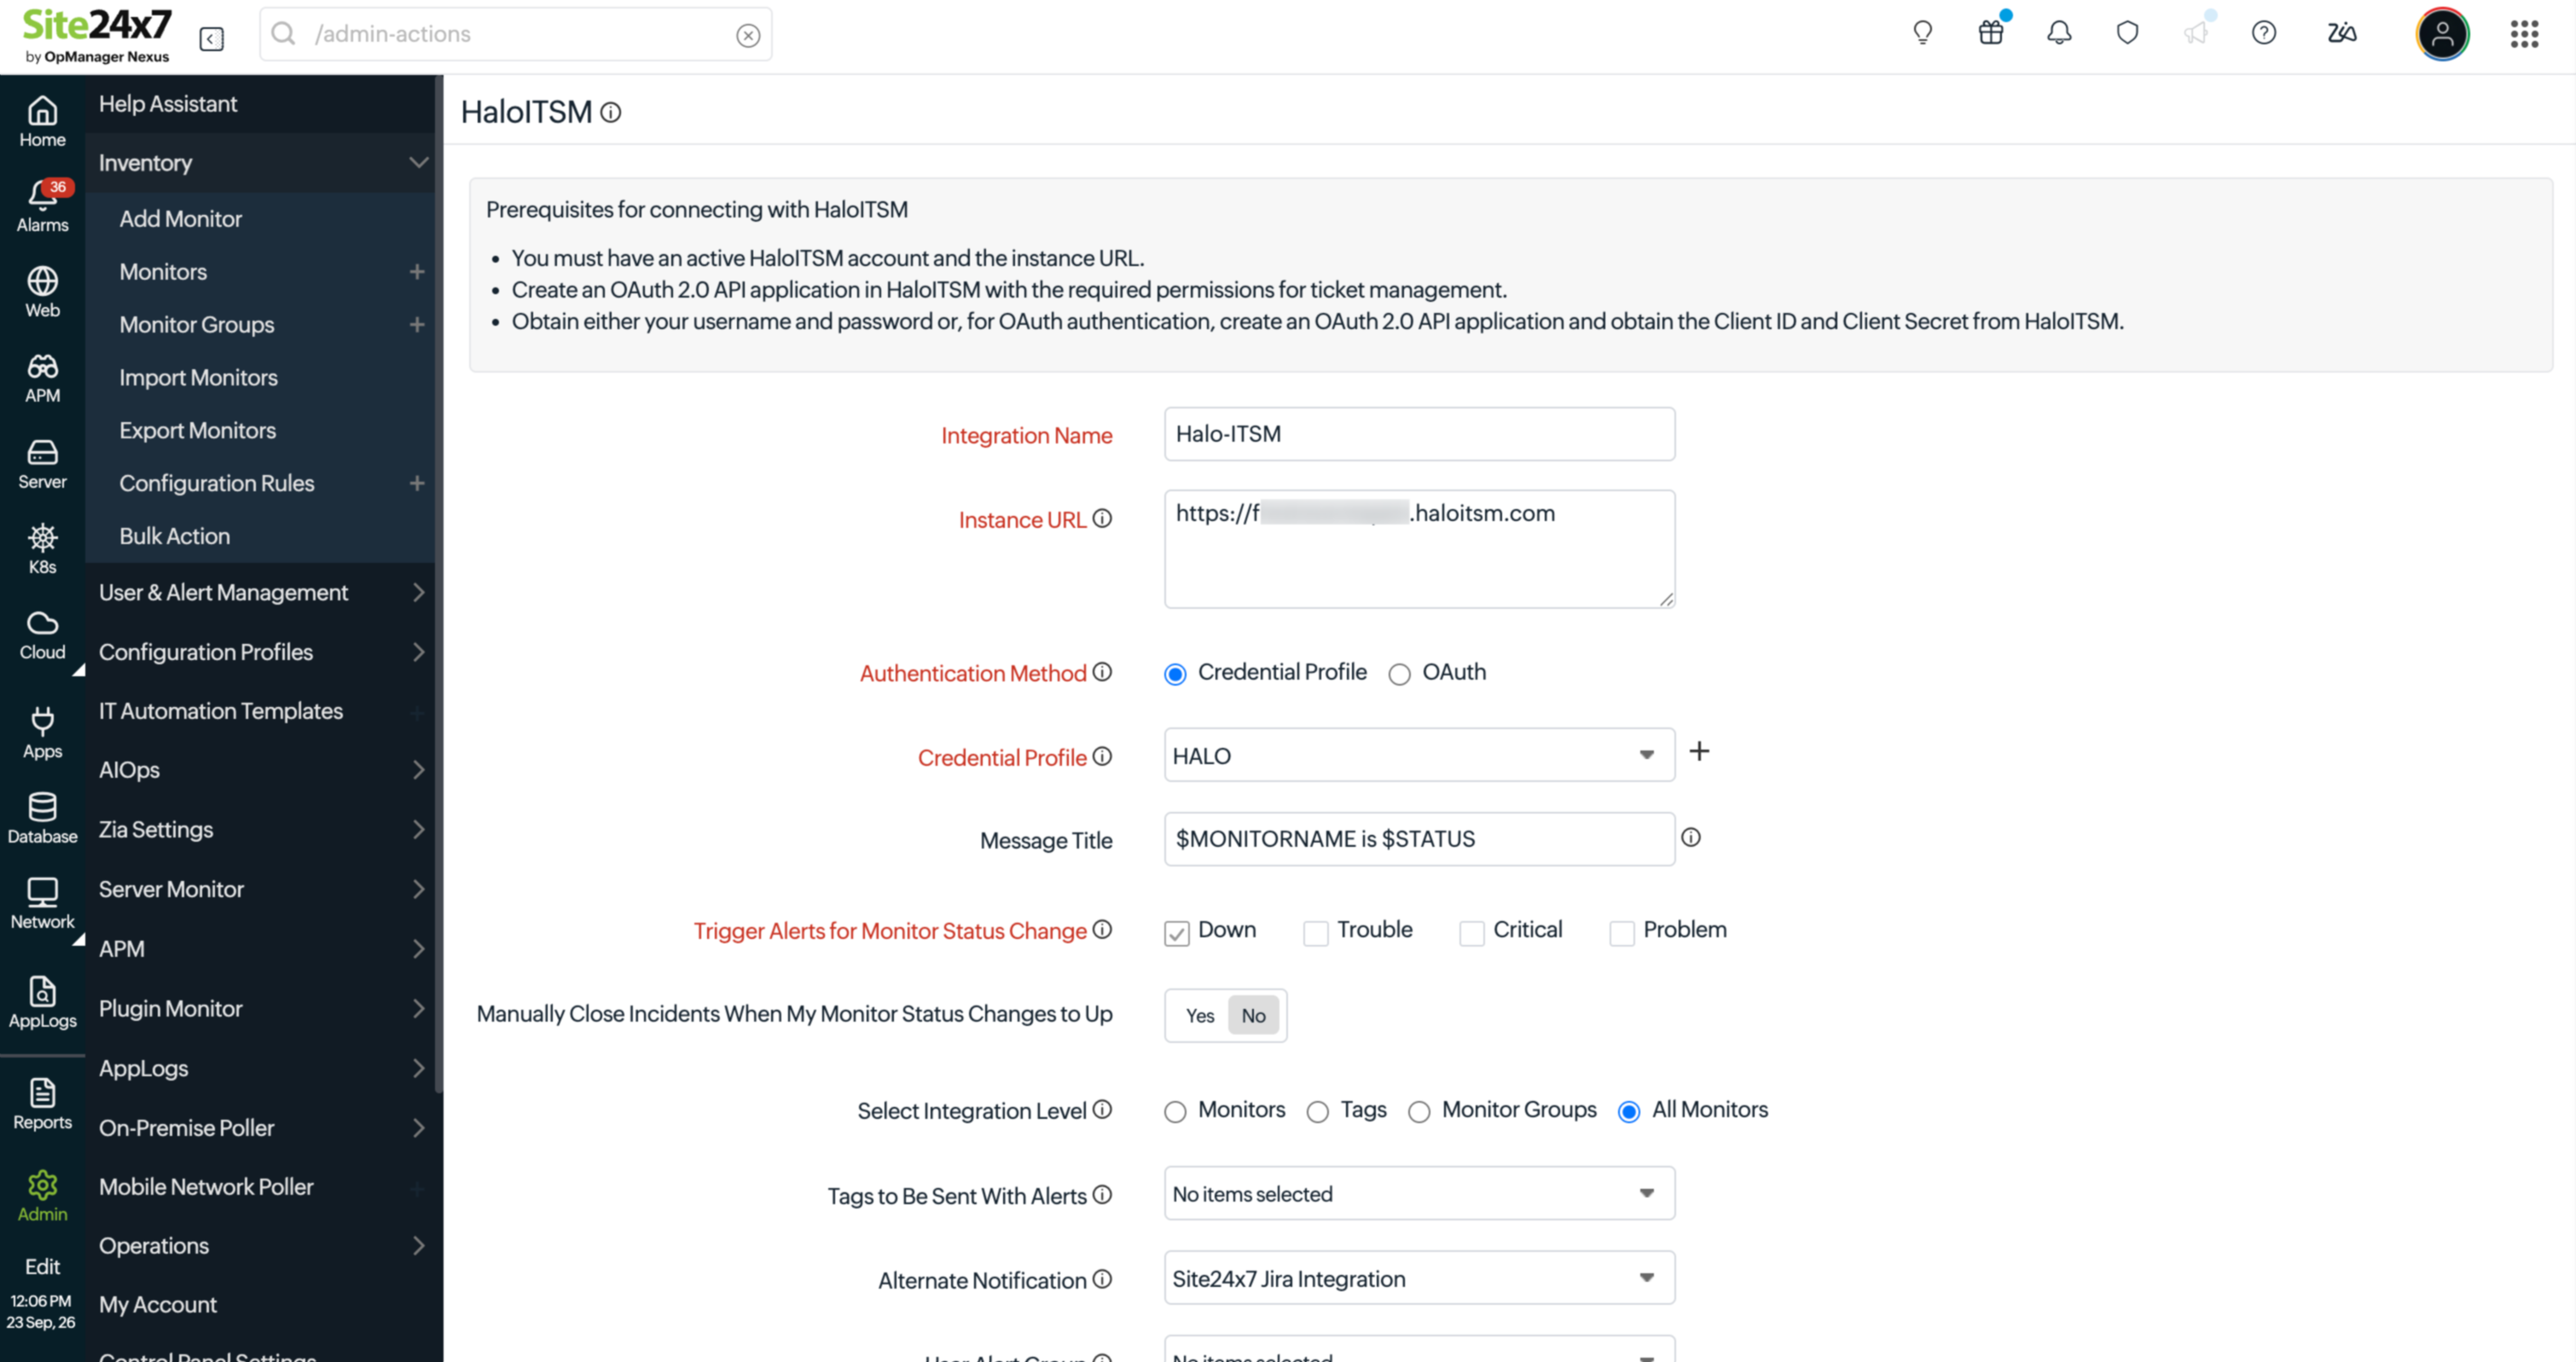
- Integration Name: Provide the name of your integration.
- Instance URL: Provide the base URL of your HaloITSM instance. (Example: https://your-subdomain.haloservicedesk.com)
- Authentication Method: Choose your desired authentication method and update the credentials accordingly.
- Credential Profile: Select an existing credential profile from the drop-down menu to securely store and manage authentication detail (such as API Access Token) required for the integration.
Using a credential profile ensures your credentials are not exposed and can be securely reused across the application.
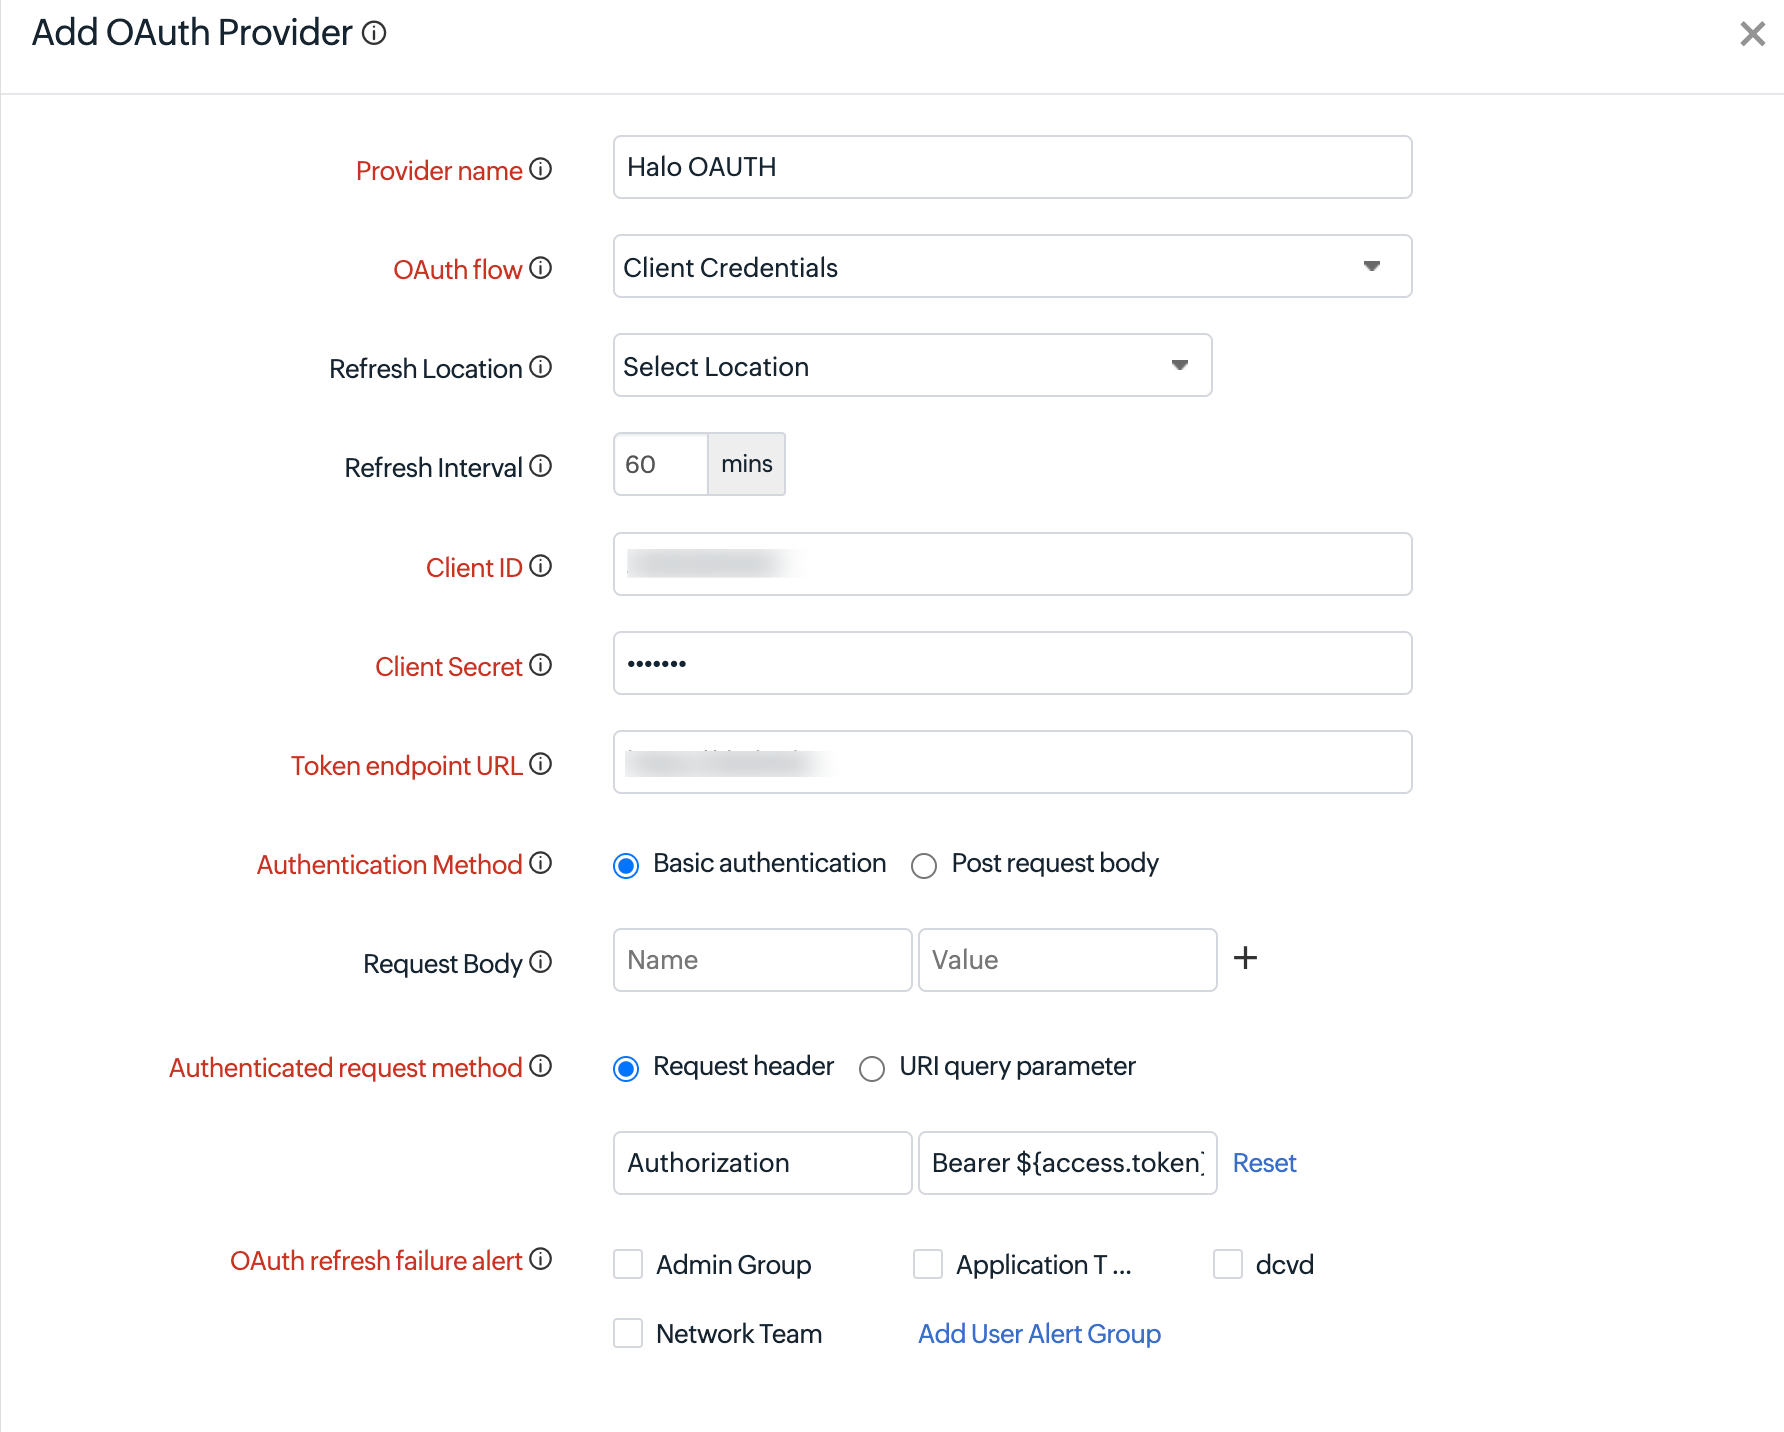
Click the + button to add a new credential profile if one doesn’t already exist. - OAuth: Provide the OAuth credentials. Select an existing Provider Name from the configured OAuth, or click the + button to add a new one. While creating an OAuth provider, select Client Credentials as the OAuth Flow and provide the Client ID and Client Secret obtained from HaloITSM.
- Credential Profile: Select an existing credential profile from the drop-down menu to securely store and manage authentication detail (such as API Access Token) required for the integration.
- Message Title: Enter a title for the HaloITSM ticket. Type $ to select the parameters from the available incident parameters and dynamically populate the ticket title.
Example: $MONITORNAME is $STATUS - Trigger Alerts for Monitor Status Change: Select the monitor status changes that should create or update tickets in HaloITSM. The available options are Down, Trouble, Critical, and Problem. Select at least one status.
- Manually Close Incidents When My Monitor Status Changes to Up: Use the toggle button to decide whether to close incidents manually or automatically in HaloITSM when the Site24x7 monitor status changes to Up. By default, the incidents are resolved automatically in HaloITSM.
- Select Integration Level: Choose the resources for which alerts should be sent to HaloITSM. The available options are:
- Monitors: Select specific monitors for which alerts should be sent to HaloITSM.
- Tags: Select specific tags to send alerts associated with those tags.
- Monitor Groups: Select specific monitor groups to send alerts from monitors in those groups.
- All Monitors: Send alerts from all monitors in your account to HaloITSM.
- Tags to Be Sent With Alerts: Select the tag keys associated with your monitors that should be included with alerts sent to HaloITSM. If no tags are selected, all applicable monitor tags will be included with the alert.
- Alternate Notification: Select an alternate notification medium that can use if the primary HaloITSM integration encounters an issue.
- User Alert Group: Select the user alert groups that should be notified if the HaloITSM integration fails. This helps the appropriate team identify and troubleshoot integration failures.
NoteCustom parameters are supported through notification templates. Configure the parameters in the template to include them in alerts sent to the integration.
- Click Save and Test to save the integration and send a test alert. Alternatively, click Save to complete the configuration without sending a test alert.
Once configured successfully, the HaloITSM integration will be listed on the Third-Party Integrations dashboard.
Customize alerts using notification templates
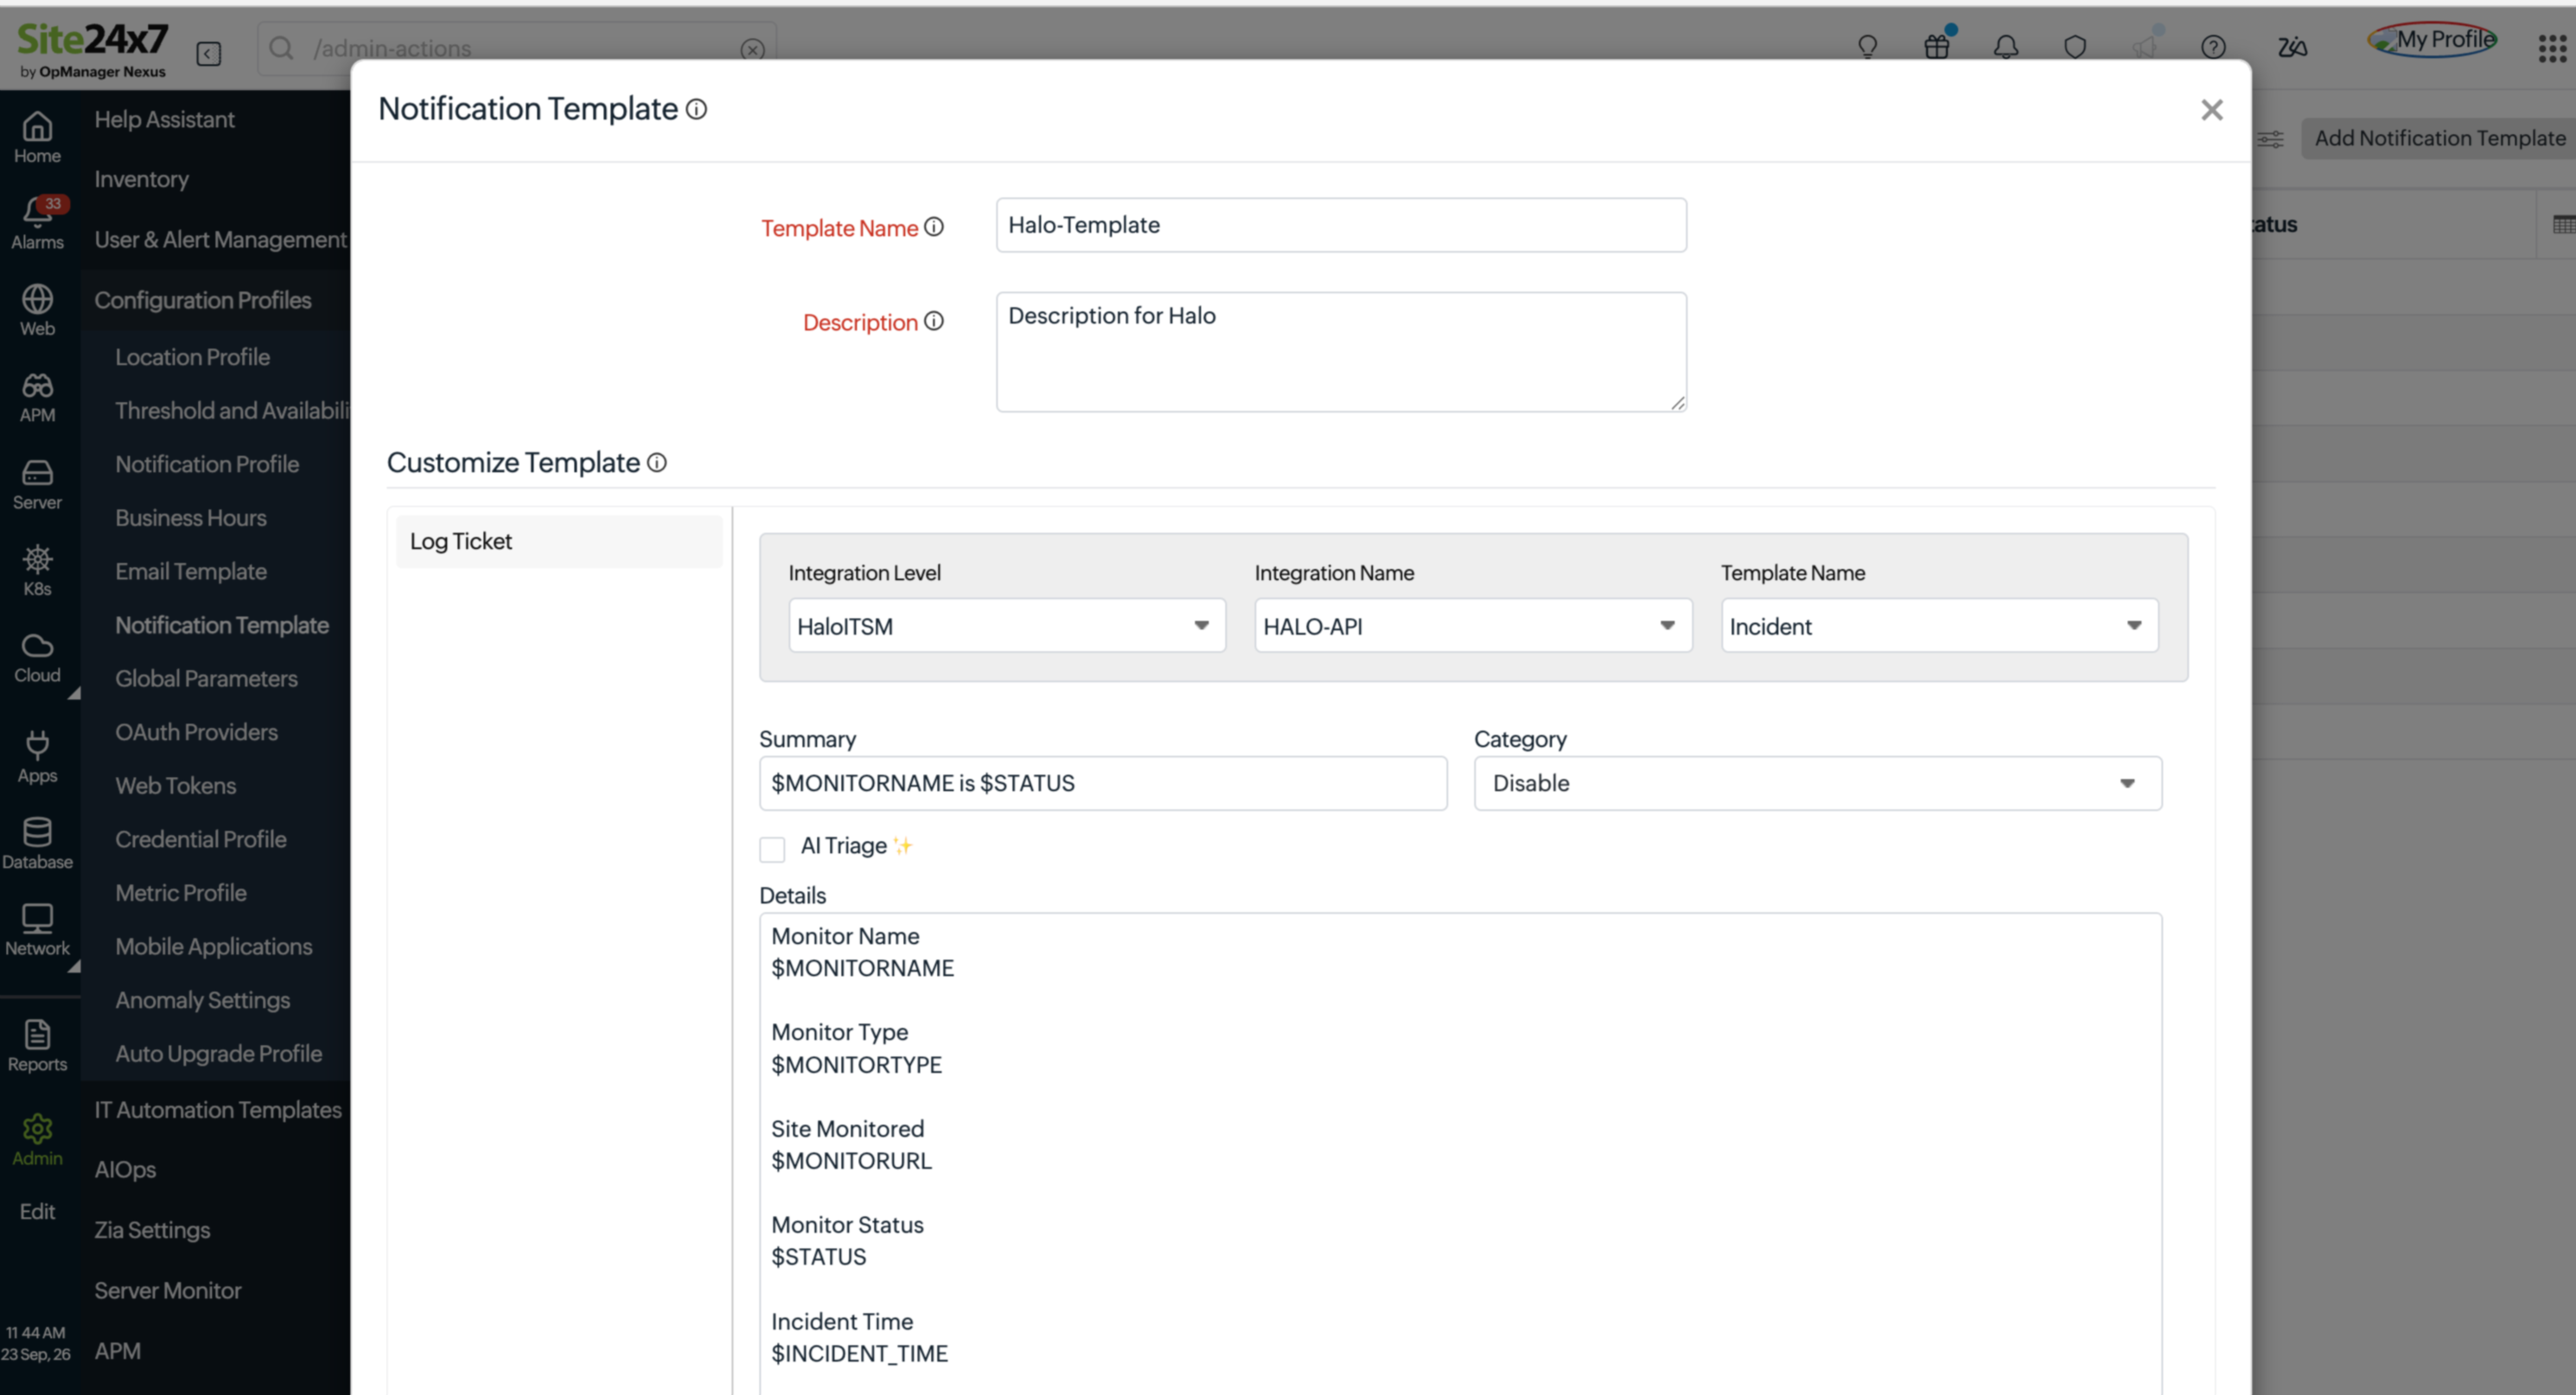
You can use Notification Templates to customize the alert information sent to HaloITSM. Notification templates allow you to define the content and format of the alert based on your requirements.
To add and configure a notification template, refer to Notification Templates.
Once configured, alerts sent to HaloITSM will be displayed in the customized format defined in the selected notification template.
Testing the HaloITSM integration
After configuring the integration, you can send a test alert to verify the connection between this platform and HaloITSM.
- Navigate to Admin > Third-Party Integrations.
- Locate the configured HaloITSM integration.
- Click the Trigger Test Alert icon and verify that the corresponding ticket is created successfully in HaloITSM.
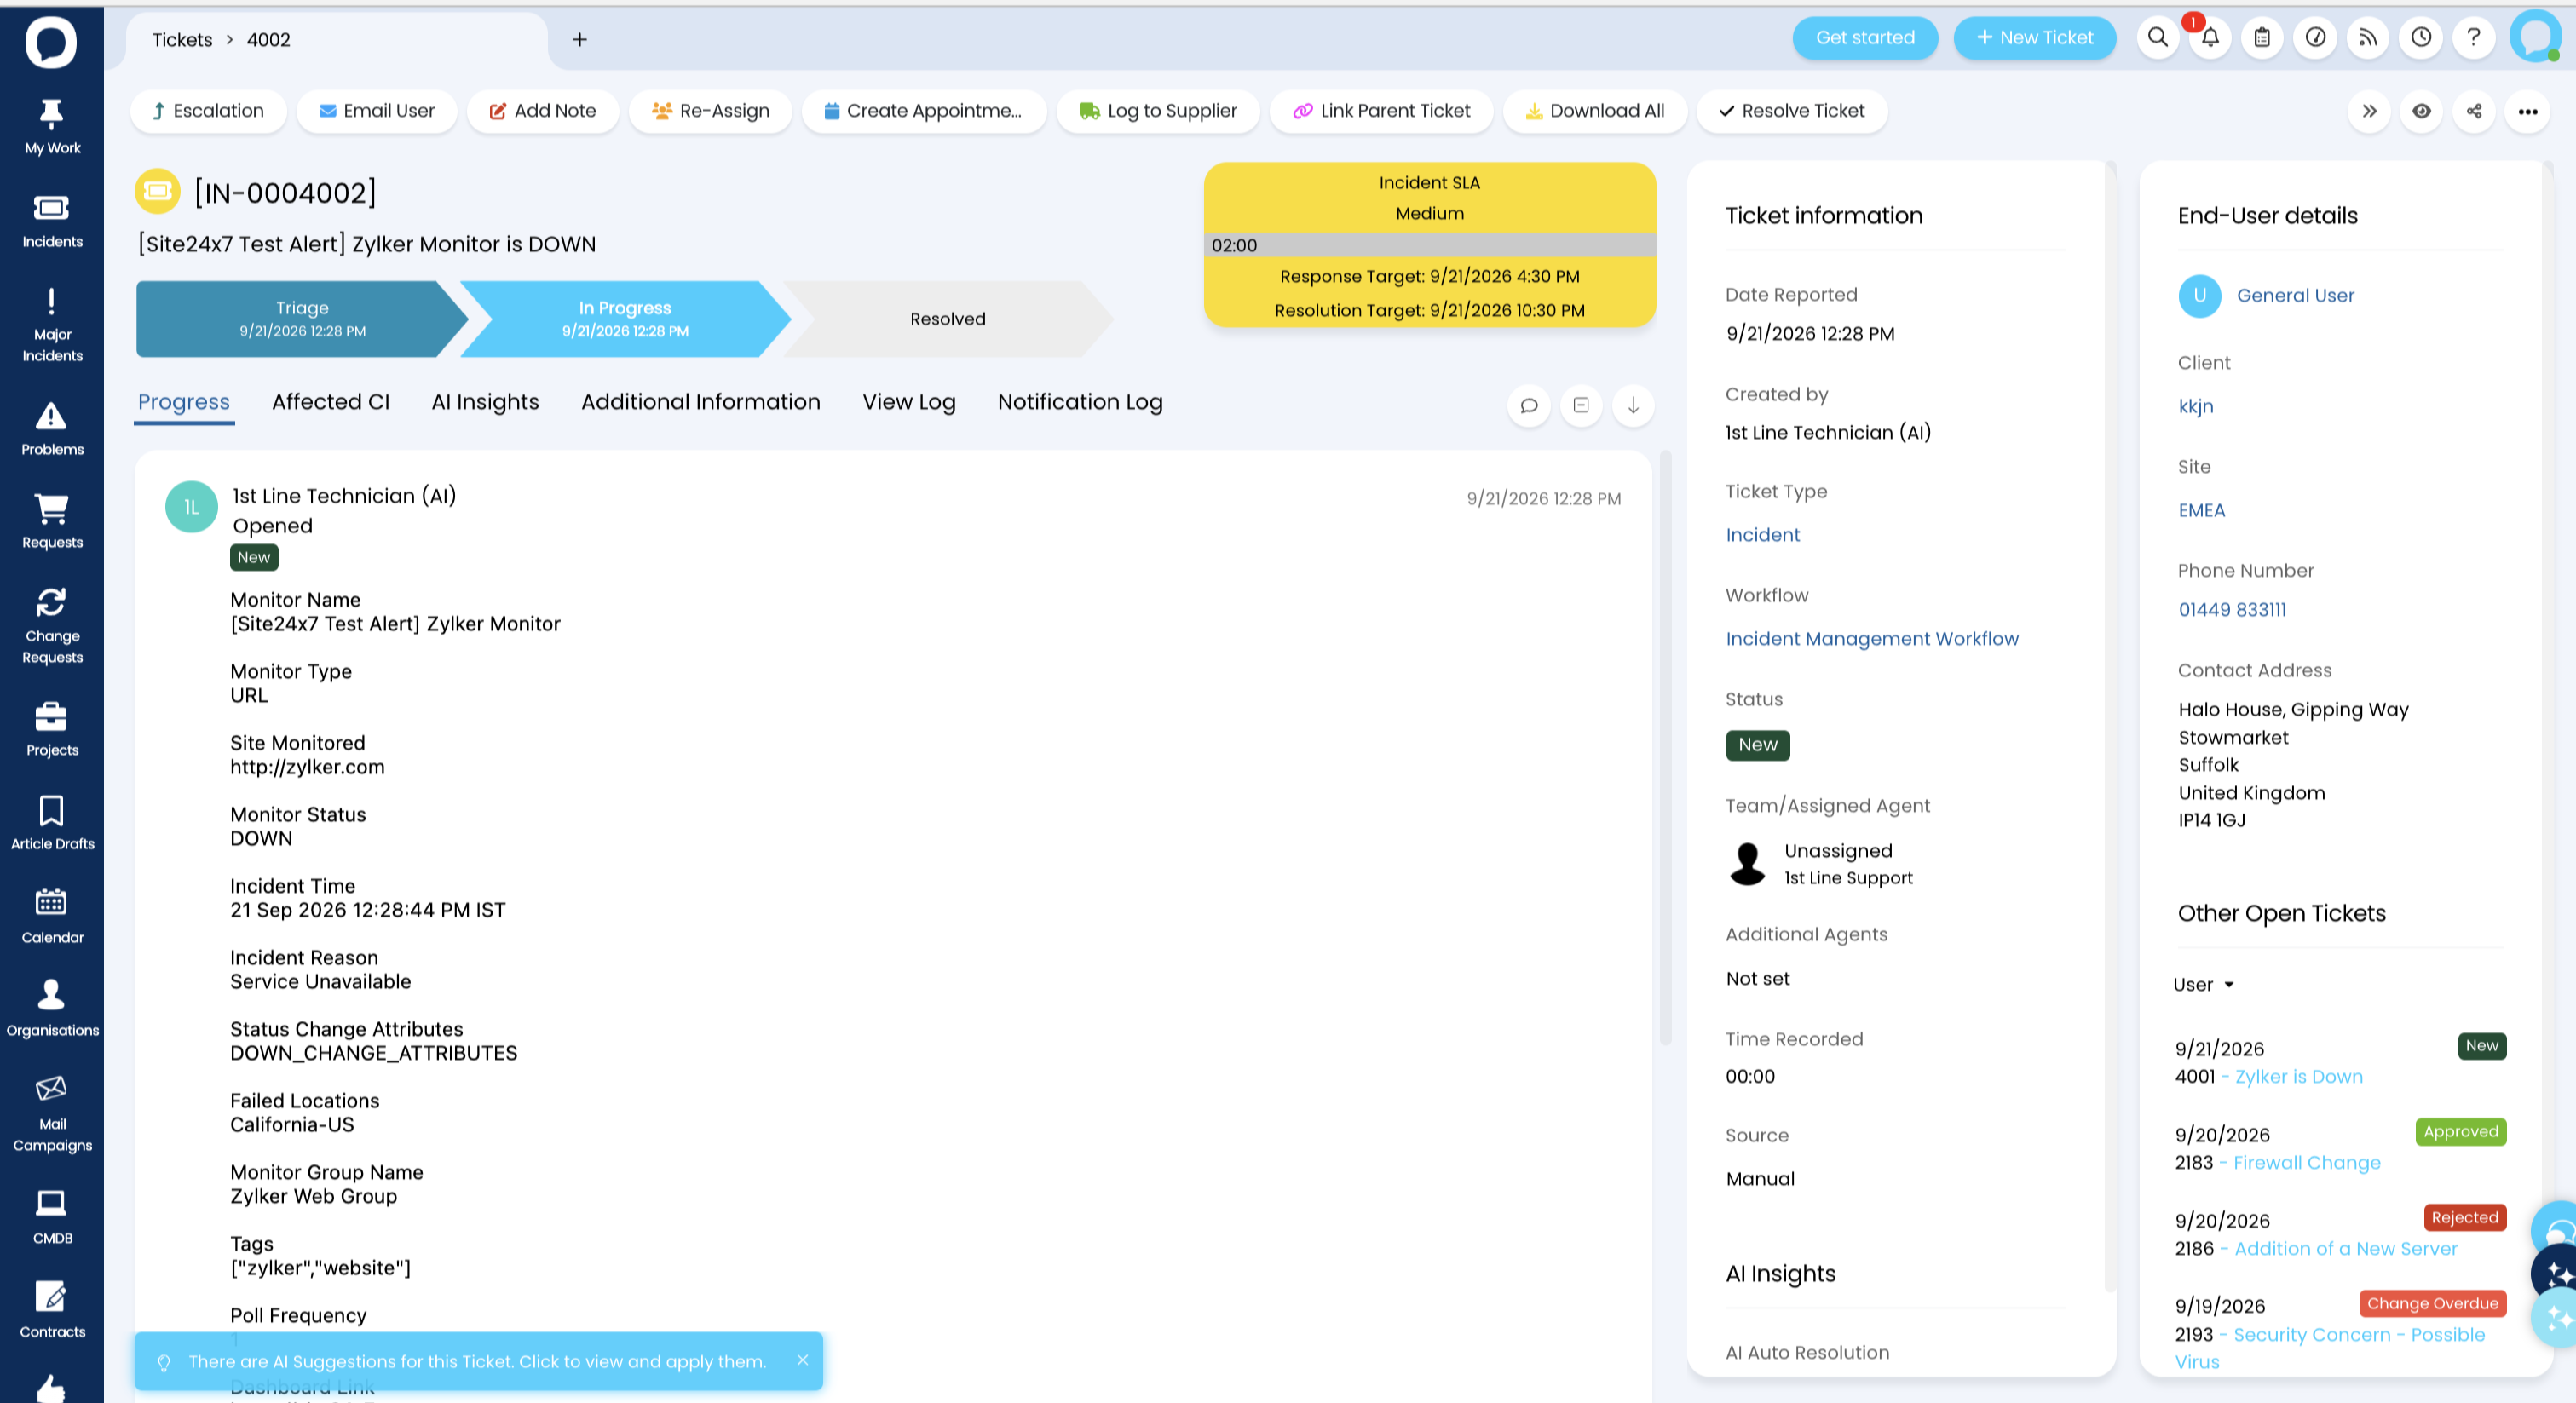
If the test fails, verify the Instance URL, OAuth provider configuration, API application permissions, and HaloITSM credentials.
Suspend, activate, or delete the HaloITSM integration
Follow the steps below to suspend/activate or delete the integration:
Suspend
- Log in with your account.
- Navigate to Admin > Third-Party Integrations.
- Click the hamburger icon [icon] next to the HaloITSM integration.
- Select Suspend.
This will stop sending alert notifications to your HaloITSM account.
Activate
- Log in with your account.
- Navigate to Admin > Third-Party Integrations.
- Click the hamburger icon [icon] next to the HaloITSM integration.
- Select Activate.
This will resumes sending alert notifications to your HaloITSM account.
Delete
- Log in with your account.
- Go to Admin > Third-Party Integrations.
- Click the hamburger icon [icon] next to the HaloITSM integration.
- Select Delete.
The HaloITSM integration is permanently removed from your account. This action can't be undone.
Closedloop integration process
As part of the Closedloop integration process (CLIP), ITSM incident template details are displayed directly on the product’s Events page, providing quick access to relevant incident information.
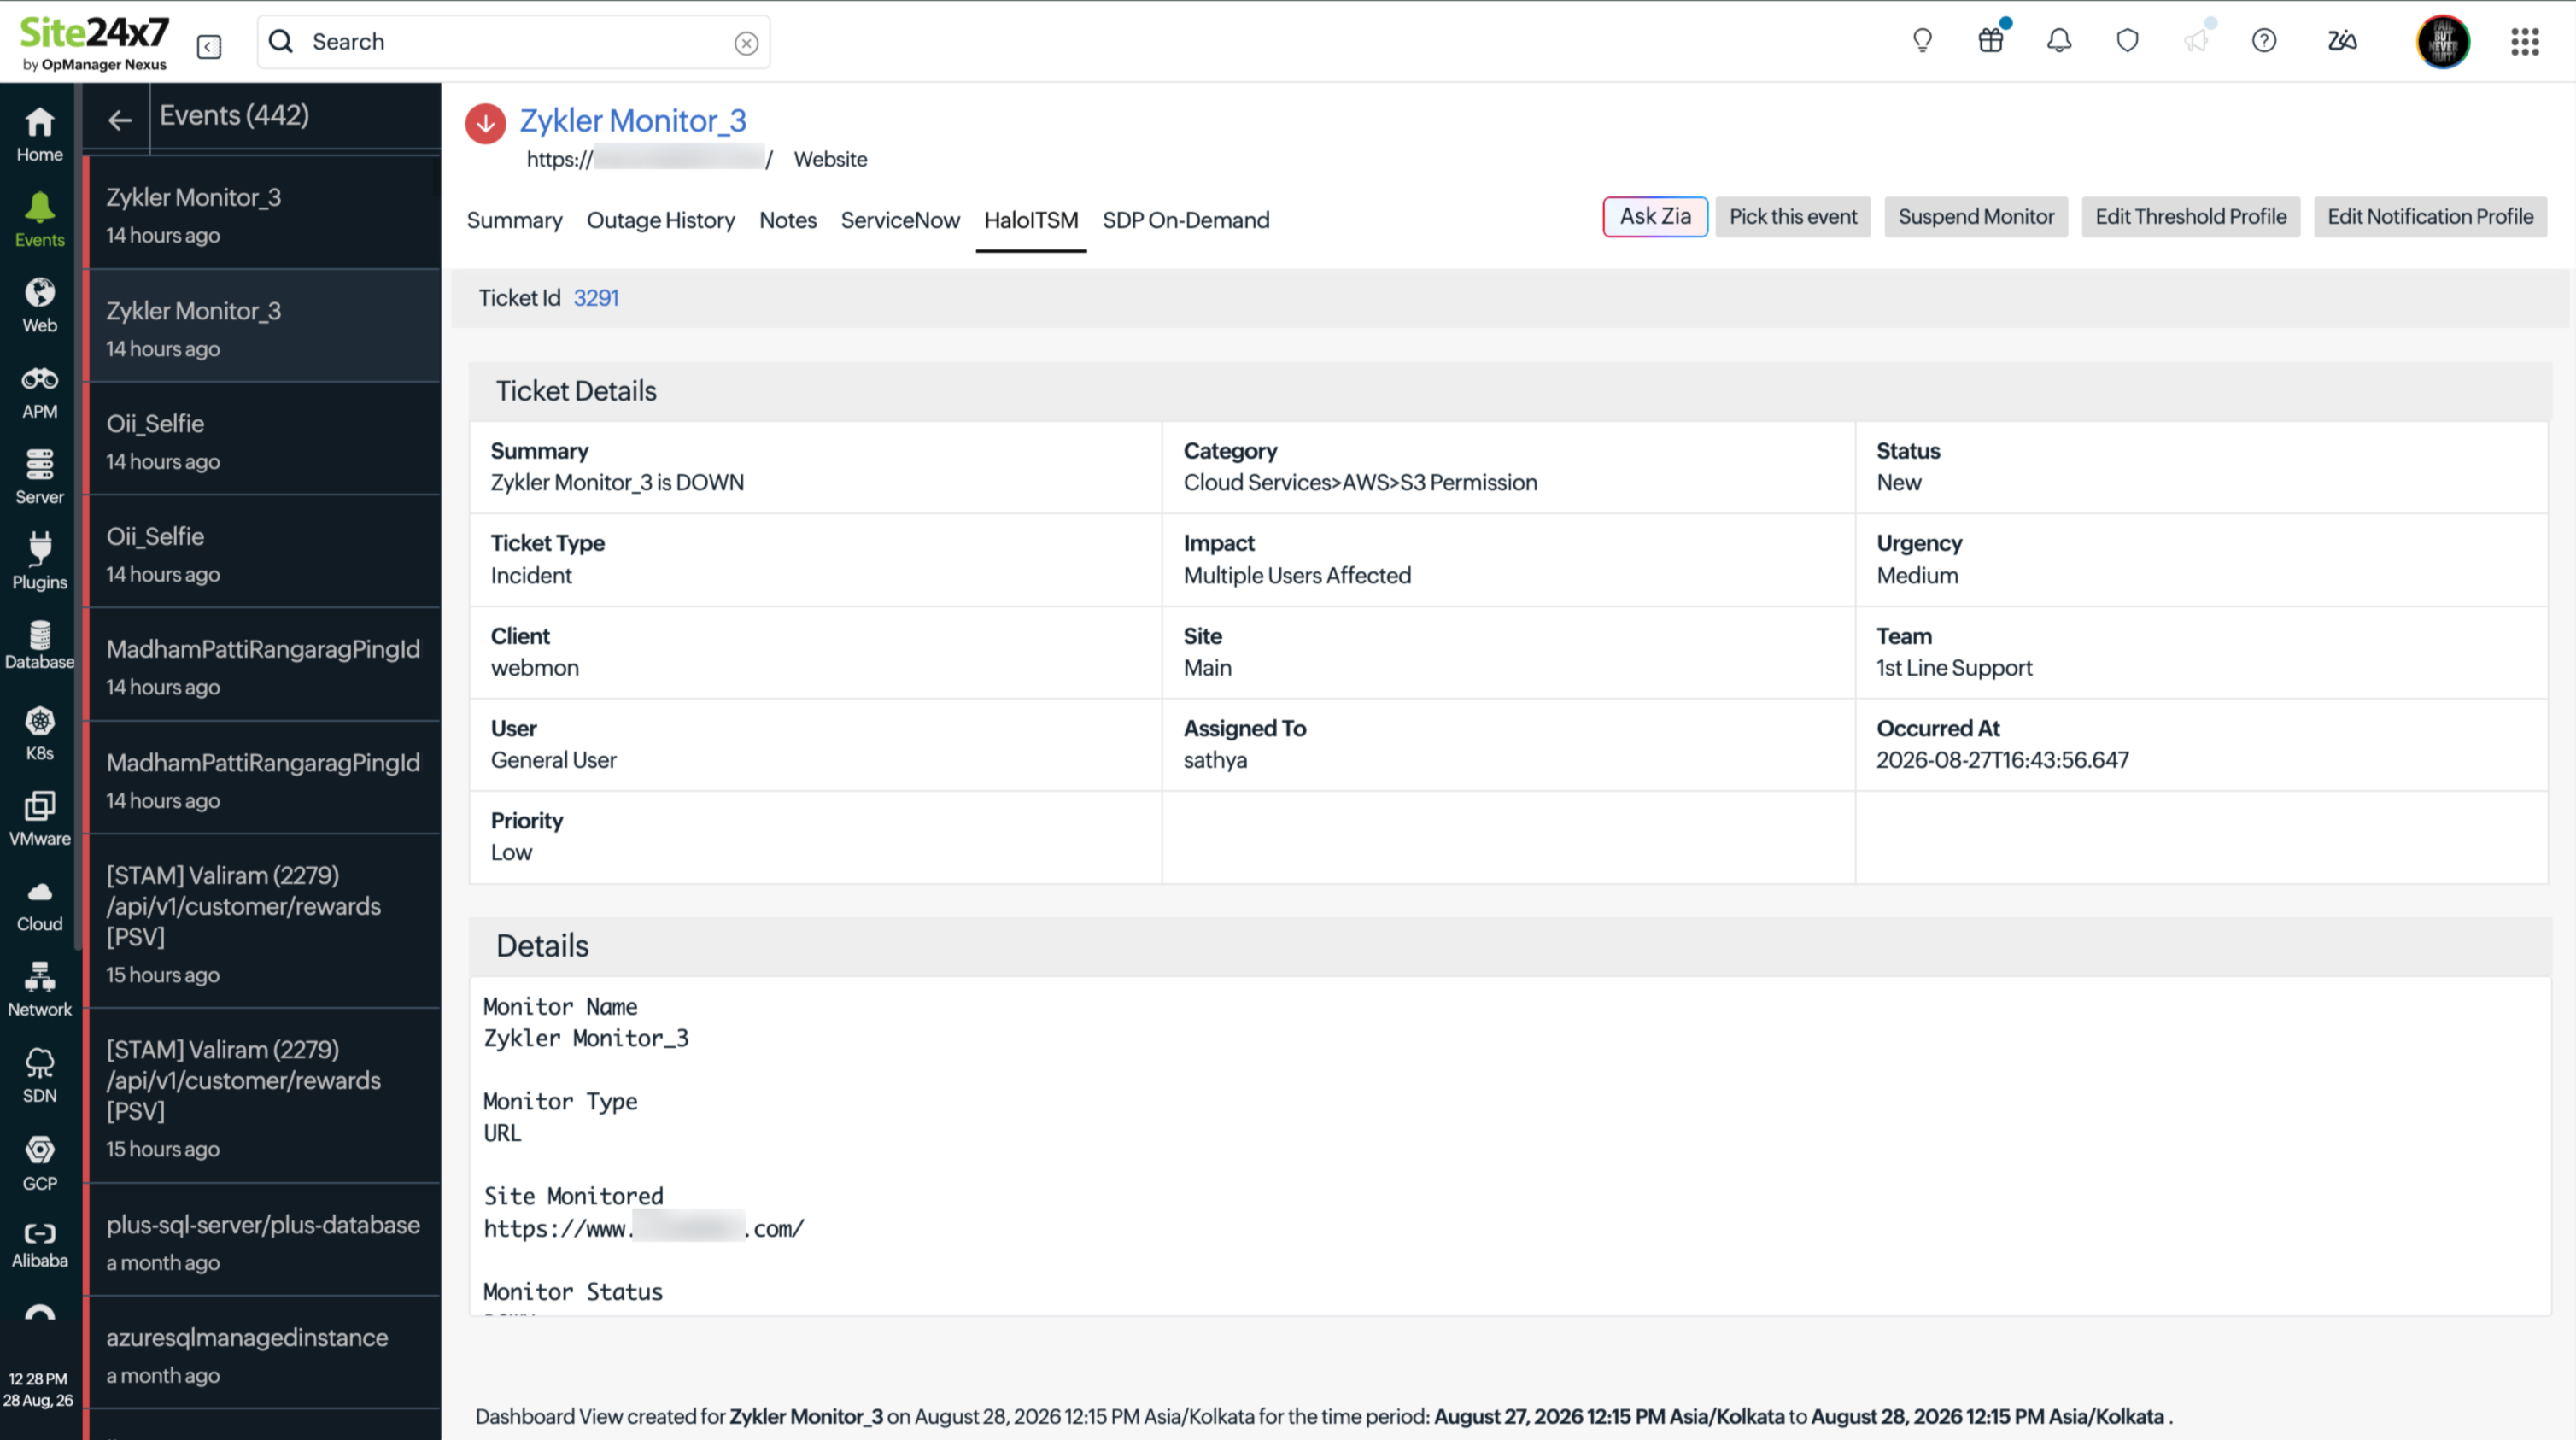
-
On this page
- Key capabilities of the integration
- Prerequisites
- Configuring the HaloITSM side of the integration
- Configuring the monitoring application side of the integration
- Customize alerts using notification templates
- Testing the HaloITSM integration
- Suspend, activate, or delete the HaloITSM integration
- Closedloop integration process