Scheduled Maintenance
Schedule a maintenance window to collaborate effectively within your IT team. On scheduling a maintenance window, all your monitor alerts get suppressed by default. You can even increase your overall uptime by enabling monitoring during the maintenance period. Once the monitoring is enabled during maintenance, the Maintenance Monitors view will accurately track and list the real-time status of the monitor during the maintenance window. Additionally, you can also schedule maintenance tasks using our Site24x7 REST APIs. Explore more.
You can also automate maintenance to gain more control over maintenance activity scheduling and configuration.
Maintenance Calendar
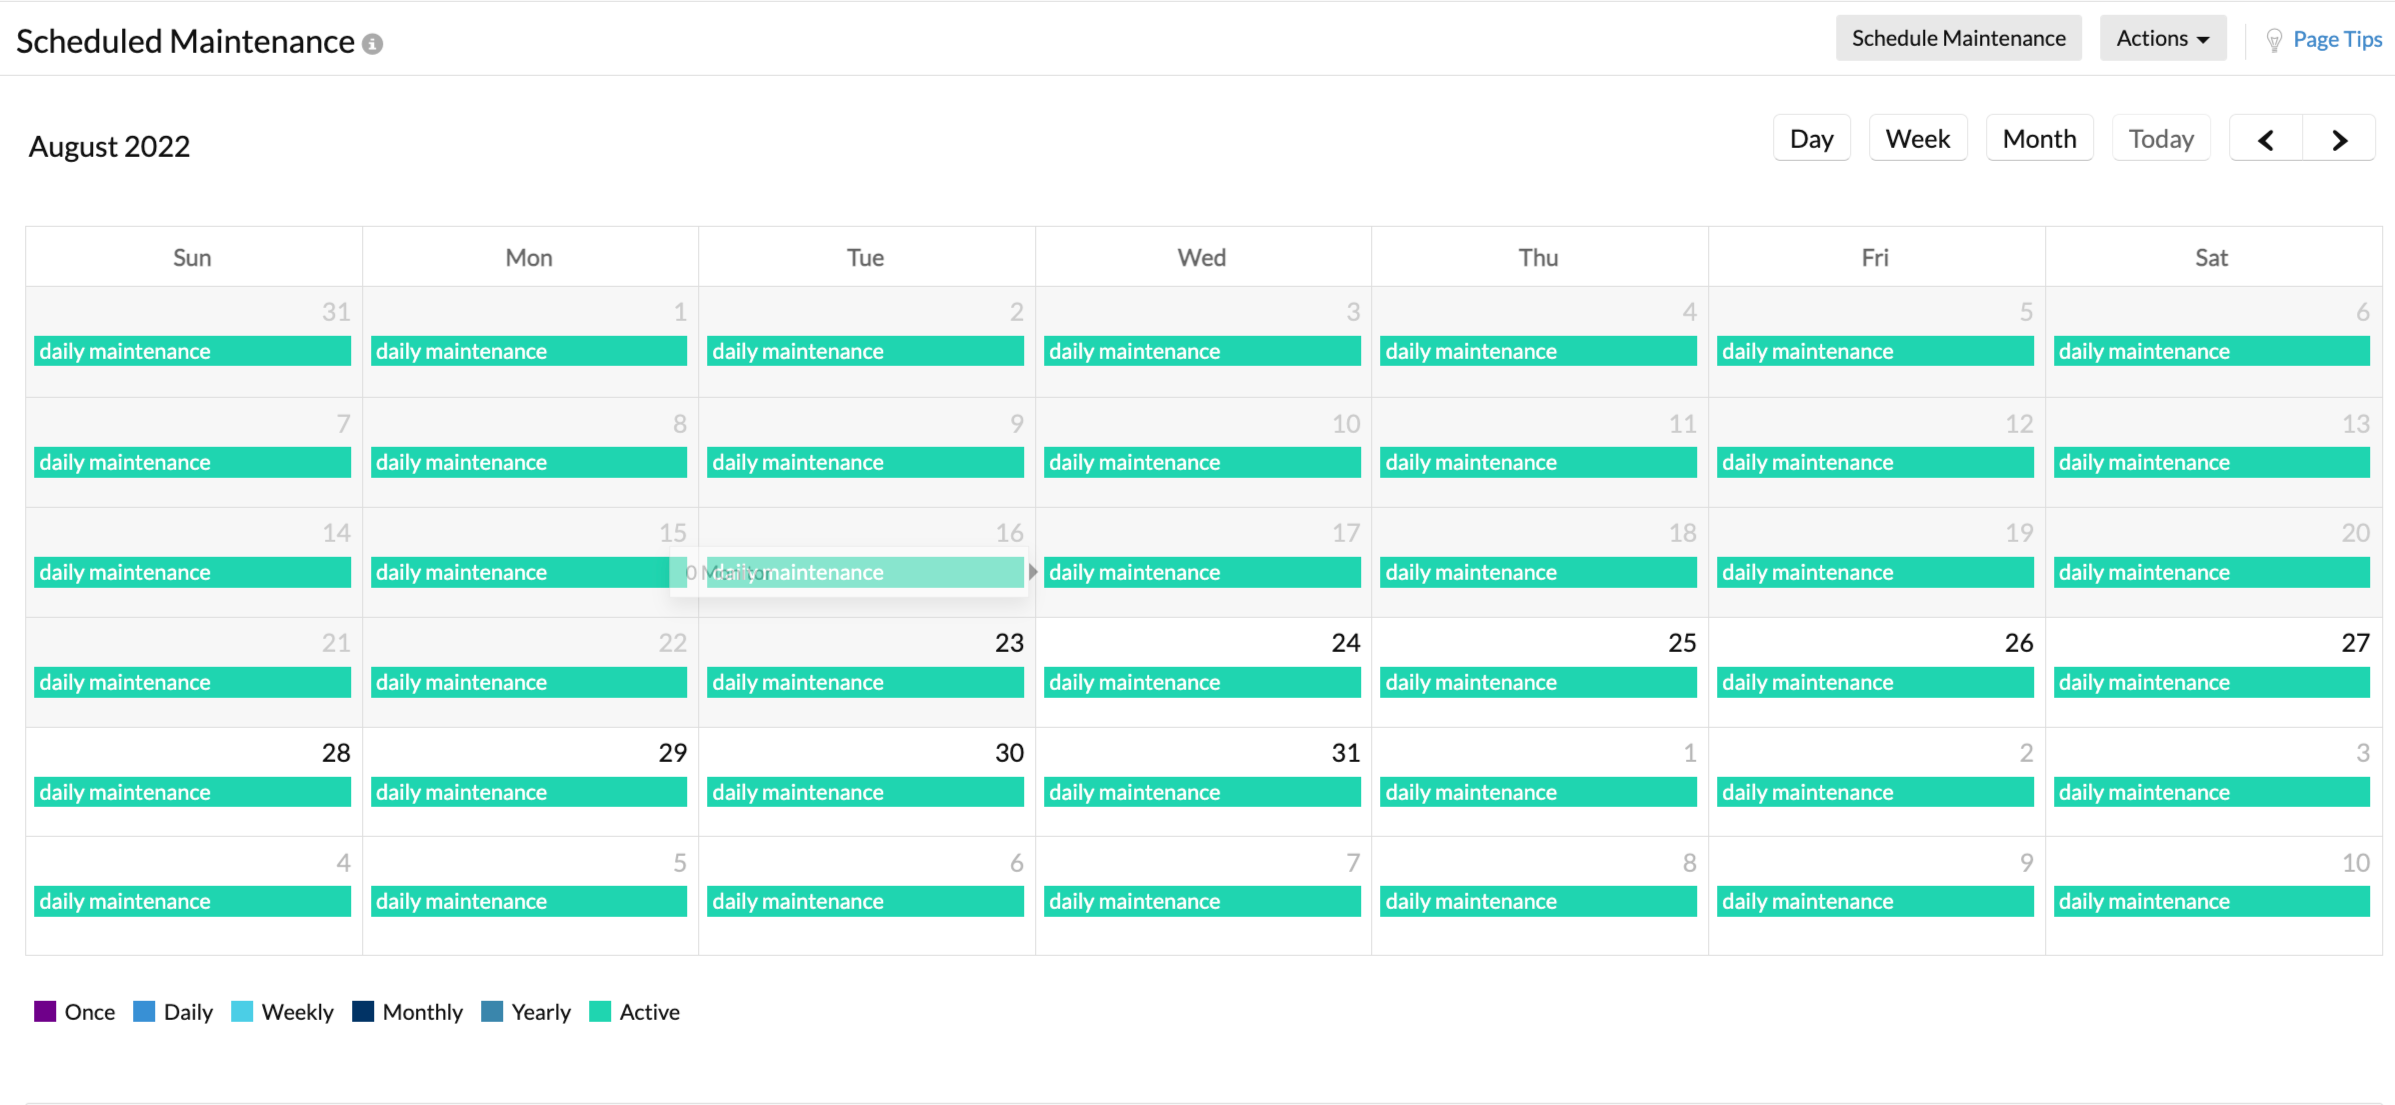
The Calendar view for maintenance shows all the maintenances scheduled by you with the exact maintenance period. You can differentiate all the maintenances based on the color assigned to the maintenance ribbon. Maintenances can be scheduled once, daily, weekly, or monthly. You can view the maintenances in the following calendar views: Day, Week, Month, or for Today. Click on the Actions button to use Download CSV option or Share iCal option. You can use Download CSV to export all the related maintenance configurations. You can click on Share iCal to obtain a public URL that can be used to import the events created in Scheduled Maintenance page into other calendars. Once you enable the option you'll be getting 'View iCal Permalink' option when you click the Actions button. But once you choose Unshare iCal, synchronization of data will be stopped.

Maintenance Monitors
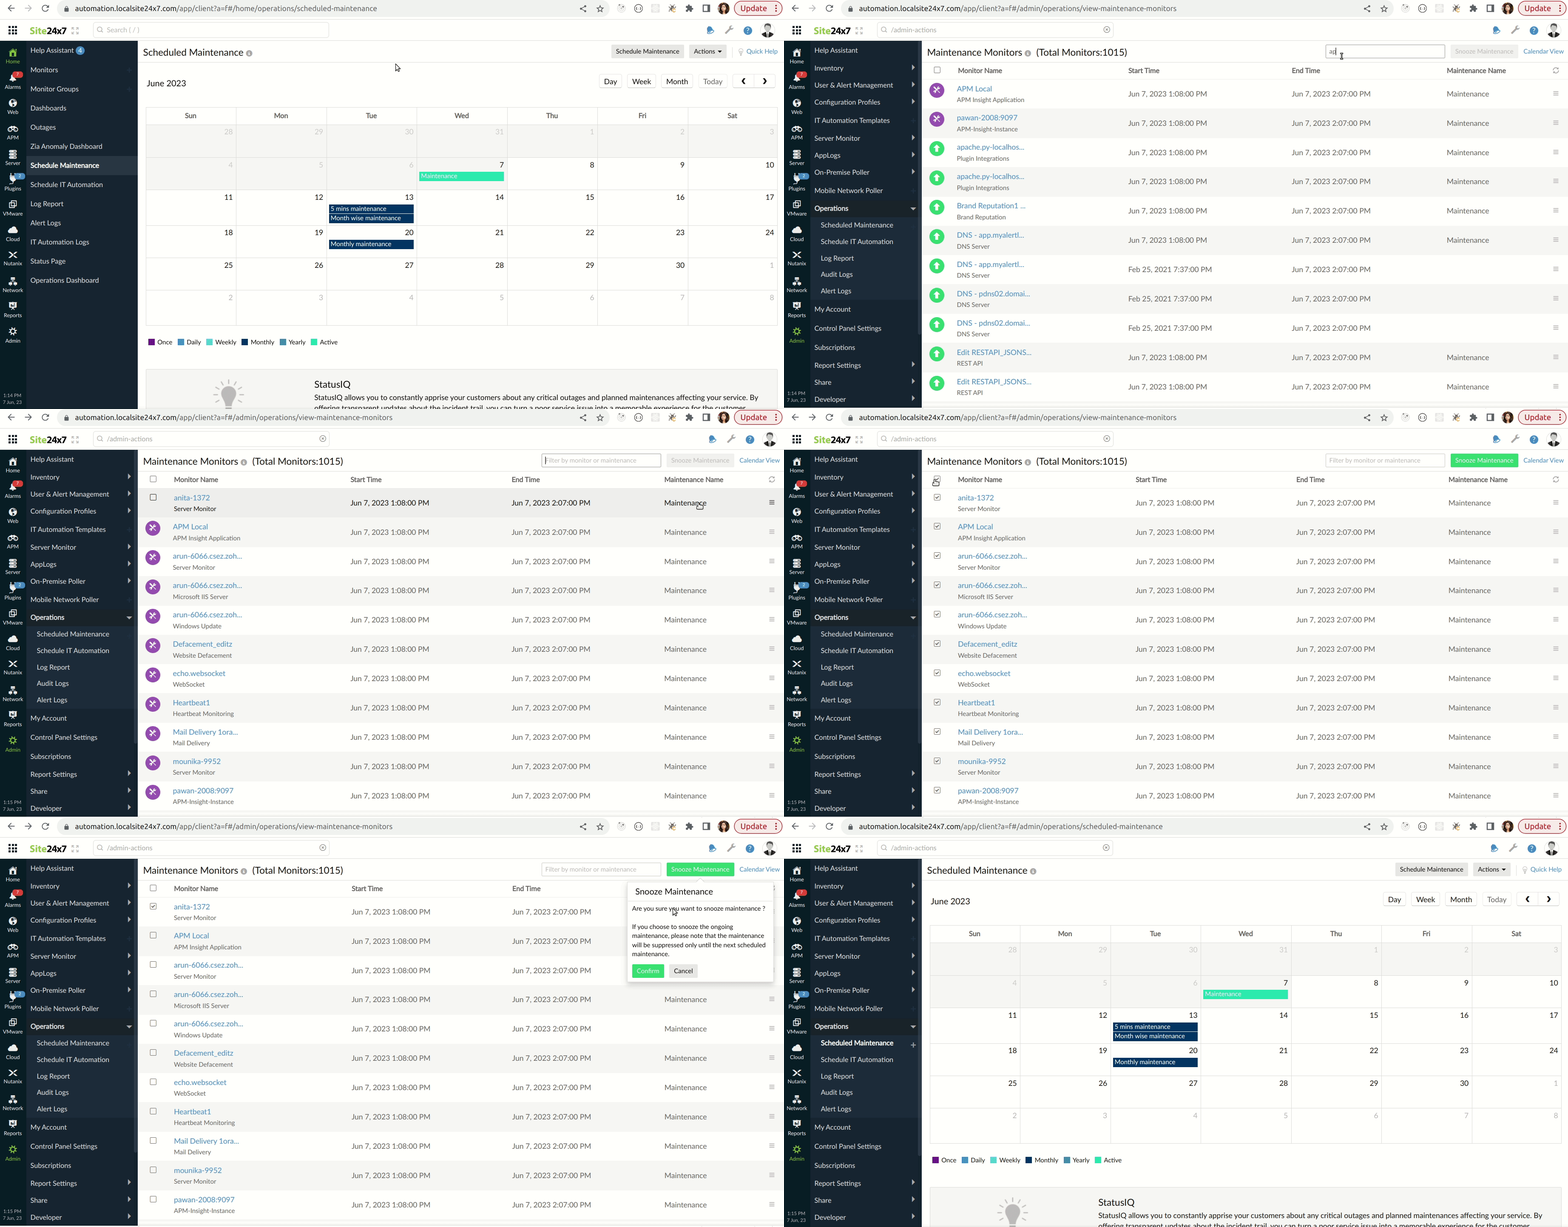
Maintenance Monitors view lists all the monitors that are currently under maintenance. It'll highlight the actual status of the monitor even when it is under the maintenance window. Say you've enabled monitoring during maintenance; now the monitor could either be under maintenance or can be in Up status. The Maintenance Monitors list will help you see the actual status of the resources during the maintenance period. To access all the monitors that are currently under maintenance, simply access the Monitors under Maintenance button listed in the calendar view. The list will have the following columns: Monitor Name, Start and End Time of the Maintenance, and the Maintenance Name associated to the monitor. You can also bulk select your monitors under maintenance and temporarily snooze any running maintenance windows without affecting the overall maintenance configuration for the monitors. Once snoozed, the current maintenance window will be suppressed until the next scheduled maintenance. You can manually refresh the list of monitors currently under maintenance by clicking the  button. To edit the monitor configuration or view the monitor dashboard, access the
 ![]() icon against the monitor ribbon.
icon against the monitor ribbon.

How to snooze monitors under maintenance
1. Log in to Site24x7.
2. Navigate to Home > Scheduled Maintenance > Monitors Under Maintenance.
Monitors currently under maintenance will be displayed here.If we hover, the status of the monitor checkbox will be shown.You can select the corresponding checkbox near the monitor for which you would like to apply the snooze option. Once you select the select the checkbox, the Snooze Maintenance option will be enabled, after which the selected monitors will be removed from monitors under maintenance.
If the maintenance period is selected as weekly or monthly for a monitor, and if the customer selects snooze maintenance, monitors will come out of maintenance only for that period. After which maintenance will continue.For example: Weekly maintenance is selected and a monitor is under maintenance. If snooze option is enabled for that monitor, the monitor will come out of maintenance for that particular week alone. Once the snooze period gets over the monitor will return to under maintenance state in the next week.
Scheduling Maintenance Window
- Log in to Site24x7.
- Click Admin > Operations > Scheduled Maintenance.
- Click Schedule Maintenance icon in Scheduled Maintenance screen.

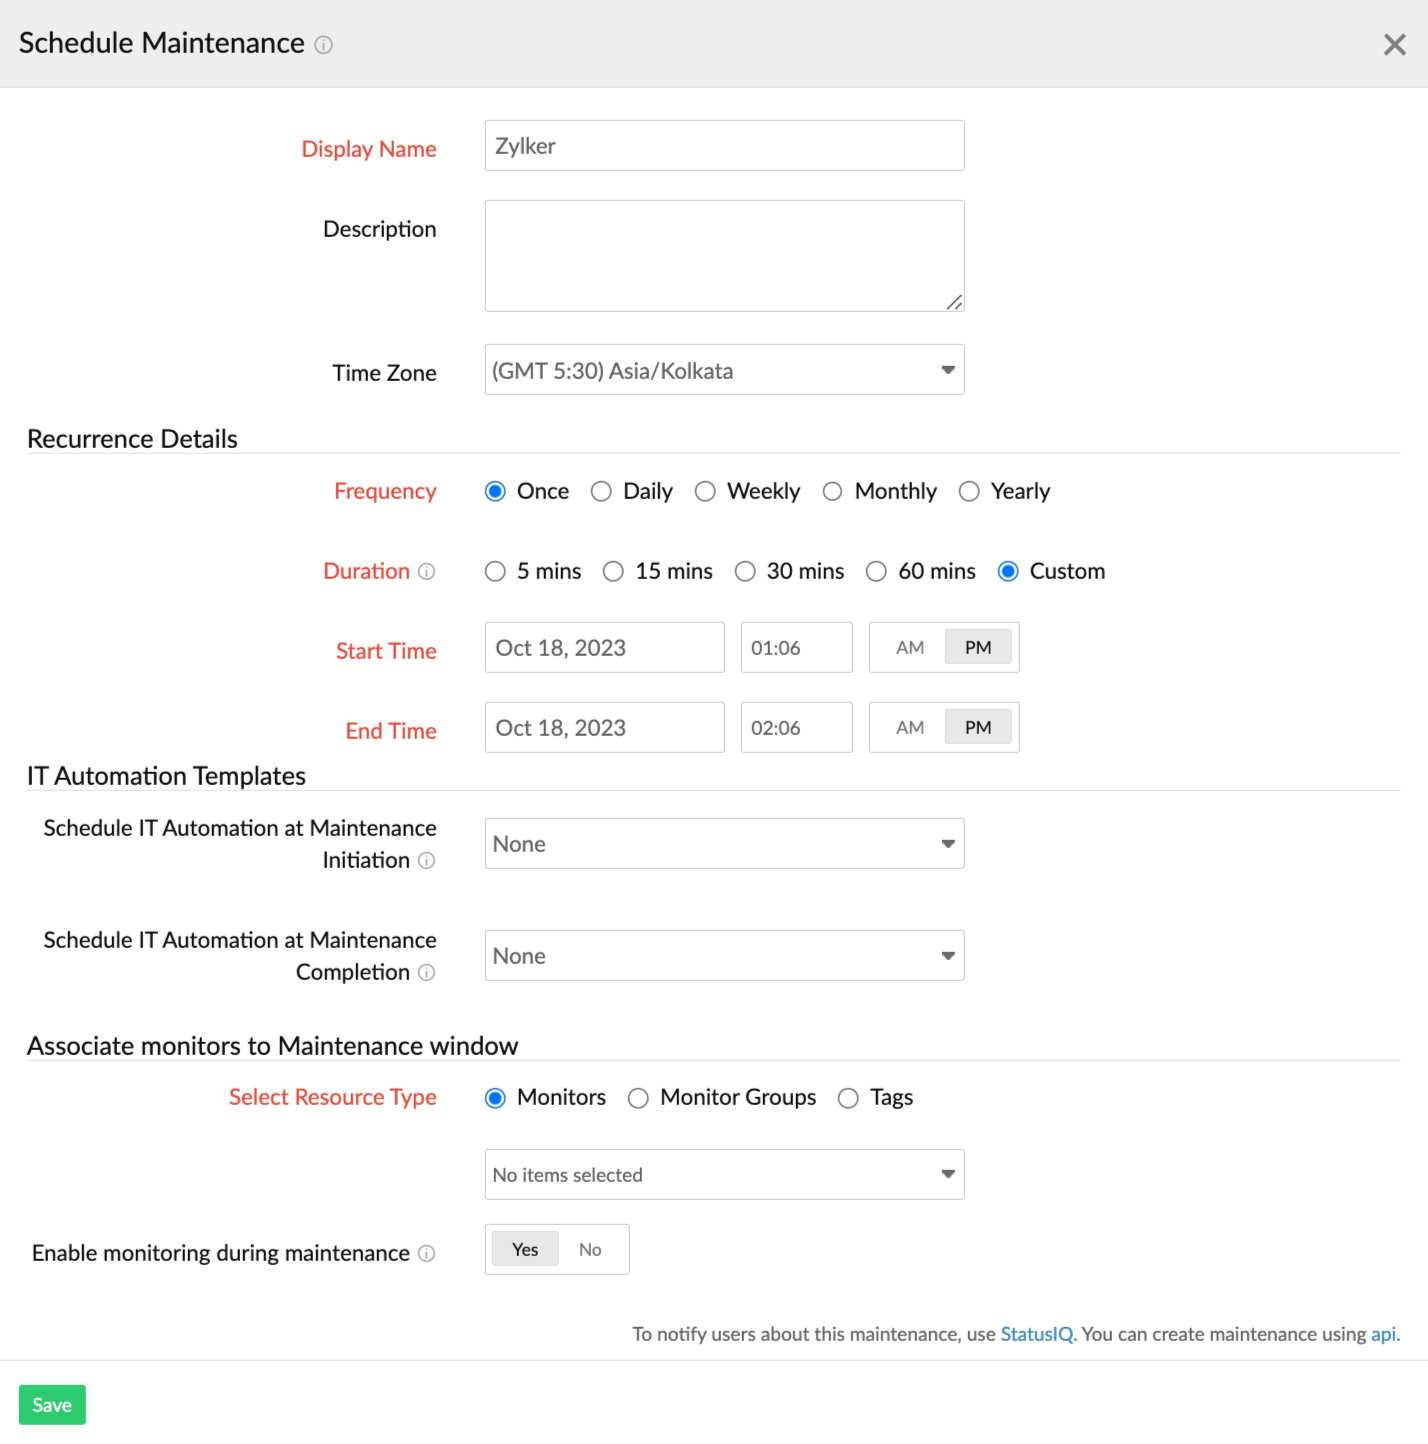
- Specify the following details to Schedule a Maintenance:
- Display Name: Provide a unique name for the maintenance window.
- Description: Provide an appropriate description for your maintenance window, such as weekly maintenance, periodic updates.
- Time Zone: Select the time zone in which you wish to schedule the maintenance window.
NoteAfter a time zone is configured, daylight saving time (DST) adjustments are applied automatically—no manual updates are needed.
- Specify the Recurrence Details:
- When the selected frequency is Once:
- Duration: Select the duration for which you'd like to schedule the maintenance. For instance, if you want to schedule maintenance for a duration of 15 minutes or 30 minutes, configure using Next Minute. Maintenance will be initiated from the next minute. To provide a custom time duration, you can enable the radio button next to Custom.
- Start Time: Choose the time at which you want the maintenance to initiate.
- End Time: Choose the time at which you want the maintenance to be completed.
- When the selected frequency is Daily: You can use this option to schedule the maintenance on a day-to-day basis.
- Start Time:Choose the time at which you want the maintenance to initiate.
- End Time: Choose the time at which you want the maintenance to be completed.
- When the selected frequency is Weekly:
- Set Recurrence:Choose the day or time the maintenance should occur each week.
- By Day:
- Day(s): Choose the day(s) the maintenance should run.
- All Day: Enable this check box to schedule maintenance for the whole day.
- Start Time: Set the corresponding start time for your maintenance.
- Maintenance Duration: Provide the duration for which you'd like to run the maintenance in minutes. You should always set the maximum maintenance duration to less than 1,440 minutes (24 hours).
- By Time:
- All Day: Enable this check box to schedule the maintenance for the whole day.
- Start Time: Set the corresponding start time for your maintenance.
- End Time: Set the corresponding end time for your maintenance.
- When the selected frequency is Monthly:
- Set Recurrence: Specify when you want your maintenance window to reoccur every month. You can choose By Day or By Date.
If you've set the recurrence by date, then you must populate the following fields: - Start Date: Pick the date when you want your maintenance to recur every month.
- All Day: Enable this check box to schedule maintenance for the whole day.
- Start Time: Enable this check box to schedule maintenance for the whole day.
- Maintenance Duration: Specify the exact duration in minutes during which the resource will be under maintenance. You should always set the maximum maintenance duration to less than 1,440 minutes (24 hours). If you choose maintenance to occur on the 31st, which isn't available for all the calendar months, the maintenance window will be active only for those months that have 31 calendar days; the maintenance will not occur during the other months.
If you've set the recurrence by day, then provide information in the following fields: - Start Week: Pick the Nth weekday of the month when you want your maintenance to reoccur, i.e., the second Wednesday of every month. You can also choose Last to schedule maintenance for the last week of the month. For instance, if you choose Last Thursday and the month has five weeks that end on a Wednesday, then maintenance will be scheduled for the Thursday of the fourth week.
- All Day: Enable this check box to schedule maintenance for the whole day.
- Start Time: Specify the exact time at which you'd like the maintenance to reoccur.
- Maintenance Duration: Specify the exact duration in minutes during which the resource will be under maintenance. You should always set the maximum maintenance duration to less than 1,440 minutes (24 hours).
- Start the Maintenance After: Specify the number of days after which the maintenance should begin every month. In some cases, when you schedule maintenance for specific days of the month, those days can vary in terms of the number of weeks in that month. But with this option, you can now schedule the maintenance N days after a reference date. For instance, you can align maintenance with Microsoft's Patch Tuesday, which is the second Tuesday every month. If you want to schedule maintenance on the Thursday that comes after Patch Tuesday, then you can set the day as Tuesday, set the week as Second, and type 2 in the Start Maintenance After field.
- When the selected frequency is Yearly:
- All Day: Enable this check box to schedule maintenance for the whole day.
- Start Time: Choose the time at which you want the maintenance to start.
- End Time: Choose the time at which you want the maintenance to start.
NoteYou can set the time in 12 or 24-hour format. To set your time preferences, navigate to Profile > My Account.
- When the selected frequency is Once:
- Maintenance window:
- Start the Maintenance On: Select the date on or after which you want the maintenance to initiate based on the recurrence configuration.
- End the Maintenance: Select a date to end the maintenance. Select Never if you want it to continue indefinitely, or you can choose to end it after N number of times.
NoteThe maintenance window will not be available if you choose Once.
- IT Automation:
- Schedule IT Automation at Maintenance Initiation: Use this option to schedule an automation after the maintenance starts.
- Schedule IT Automation at Maintenance Completion: Use this option to schedule an automation before the maintenance ends.
- Associate Monitors to Maintenance window: Click the radio button and pick the correct Resource Type that you want to associate to the maintenance window. Based on your selection, you can simultaneously associate multiple monitors or monitor groups from the drop-down list.
NoteInclude Subgroups: Enable this option to include subgroups of the selected Monitor Groups. Otherwise, only the selected Group will be considered.Only users with All Monitors permission will be able to view and choose Tags option under Resource Type. For APM Insight, maintenance is marked at the application level only and not for individual instances.
- Enable monitoring during maintenance to improve overall uptime: A monitor's status doesn't necessarily remain Down throughout the maintenance period. This option lets you capture the exact uptime and status of the monitor even during the maintenance period. Enabling the toggle button will trigger data collection of monitors during the maintenance period. Disabling it will put the data collection on hold until the end of the maintenance. Although the real-time status is captured in log report, no alerts will be triggered during this period.
Note
If you've enabled monitoring during the maintenance, and:
- Poll status is UP, then the monitor's status is deemed as UP. Polling will done from the primary location alone. Secondary location rechecks will be handled every 30 minutes.
- Poll status returns as Down, then monitor's status is deemed as under MAINTENANCE. However, the data collection doesn't stop and the polling continues until the status is detected as UP. The data collection is persisted throughout the maintenance period from individual configured locations, thus gathering the exact maintenance time that the monitor was subjected to during the entire period.
- When data collection happens during maintenance, poll status of the overall monitor in the details page and poll status of monitor from a specific location are displayed independently inside the client.
- Individual polled data will be captured and logged in the Log Report separately as UP or DOWN. Also, the outage report will clearly highlight the exact maintenance time that the monitor was subjected to.
- If a Server Monitor is kept under maintenance, all its associated child monitors like IIS, SQL etc. will also be put under maintenance.
- Click Save.
- The details of the schedule will be automatically added in the scheduled maintenance dashboard, where users can view it in a Day, Weekly or Monthly view.
Note
- Any maintenance window that you've created can be edited/deleted by yourself/Admin/Super Admin user roles.
- Maintenance window will be disabled in two cases:
1. Depending on the user role.
2. Once the Maintenance is active, frequency, start time, selecting resource type, and enable monitoring will be disabled to avoid maintenance issues.
This is because these actions are task based. Once the maintenance is over Maintenance window will be enabled and the user will be able to edit those settings.
