Installing the .NET agent in Linux
The following are the steps to install the .NET agent in the Linux operating system.
Installation steps
- Log in to your Site24x7 web client.
- Navigate to APM > APM Insight.
- Click on the .NET tab.
- Switch to the Linux option and follow the instructions to download the agent.

- Copy the APMDataExporter Installation code from the console or execute the installation scripts below for S247DataExporter in your terminal. Ensure that you replace YOUR_LICENSE_KEY in the command with your valid Site24x7 license key before executing the script.
wget -O InstallDataExporter.sh
https://staticdownloads.site24x7.in/apminsight/S247DataExporter/linux/InstallDataExporter.sh
sudo -E sh InstallDataExporter.sh -license.key "<YOUR_LICENSE_KEY>"
Advanced configurations
The following advanced configuration options apply only to S247DataExporter. This configuration is optional. You can modify these settings during installation if you need to change the port or proxy settings.

Field number (as marked in the image) Field name Default value Description 1 IPC host localhost Specify the domain name of the server where the exporter is hosted. 2 IPC Status Port 20021 This port is used to expose the exporter’s status information. 3 IPC Data Port 20022 This port is used for transmitting monitoring data. 4 Enable Proxy No This enables proxy support for outbound communication. 5 Install as non root This specifies the user account under which S247DataExporter runs. By default, it is installed as a non-root user for improved security and least privilege access. 6 Service Registration Yes This registers S247DataExporter as a system service, allowing it to start automatically upon system boots and be managed using standard service management commands. NoteS247DataExporter acts as a data receiver and exporter, relaying performance metrics collected by the agent to Site24x7.
- Copy the .NET Agent Installation code from the console or run the following commands in your terminal to install the .NET agent. Make sure to replace YOUR_LICENSE_KEY with your actual Site24x7 license key before executing the script.
wget -O apminsight-dotnetcoreagent-linux.sh  https://staticdownloads.site24x7.com/apminsight/agents/apminsight-dotnetcoreagent-linux.sh

sudo -E bash apminsight-dotnetcoreagent-linux.sh -LicenseKey "<YOUR_LICENSE_KEY >" -ExporterHost localhost -ExporterStatusPort 20021 -ExporterDataPort 20022
Instead of copying and pasting the code (in steps 5 and 6), you can click Download as Shell Script to download the script and install the agent directly.

- After installing the Site24x7 .NET agent, you can load it into your application using any one of the following options:
- Run Wrapper Script
- Shell Environment Script
- Manual Env Variable Configuration (where Env refers to the environment variable)

Follow these steps to load the .NET agent using the wrapper script:
- Locate the run-dotnetapm.sh script in the agent installation directory:
/opt/site24x7/ApmInsightDotNetCoreAgent/scripts/
You can also access this location using the environment variable SITE24X7_SCRIPTS_PATH. - Set the SITE24X7_APP_NAME environment variable to define the monitor name for your application:
export SITE24X7_APP_NAME="<your.monitor.name>"
- Start your application using the wrapper script. Replace your usual command (dotnet Your_Application.dll) with the following command:
$SITE24X7_SCRIPTS_PATH/run-dotnetapm.sh dotnet Your_Application.dll
This ensures that the Site24x7 agent loads automatically when your application starts.
Option 2: Shell Environment Script

You can use the shell environment script to configure the agent for your shell session.
- Locate the set-shell-env.sh script in the following directory:
/opt/site24x7/ApmInsightDotNetCoreAgent/scripts/
Alternatively, use SITE24X7_SCRIPTS_PATH. - Set the SITE24X7_APP_NAME environment variable to define your application’s monitor name:
export SITE24X7_APP_NAME="<your.monitor.name>"
- Load the agent configuration using one of the following options:
- Run the following command to load the required environment variables, then start your .NET application:
source $SITE24X7_SCRIPTS_PATH/set-shell-env.sh
- Add the script to your .bashrc profile so that every new shell automatically loads the agent configuration.
- Run the following command to load the required environment variables, then start your .NET application:
Option 3: Manual Env Variable Configuration
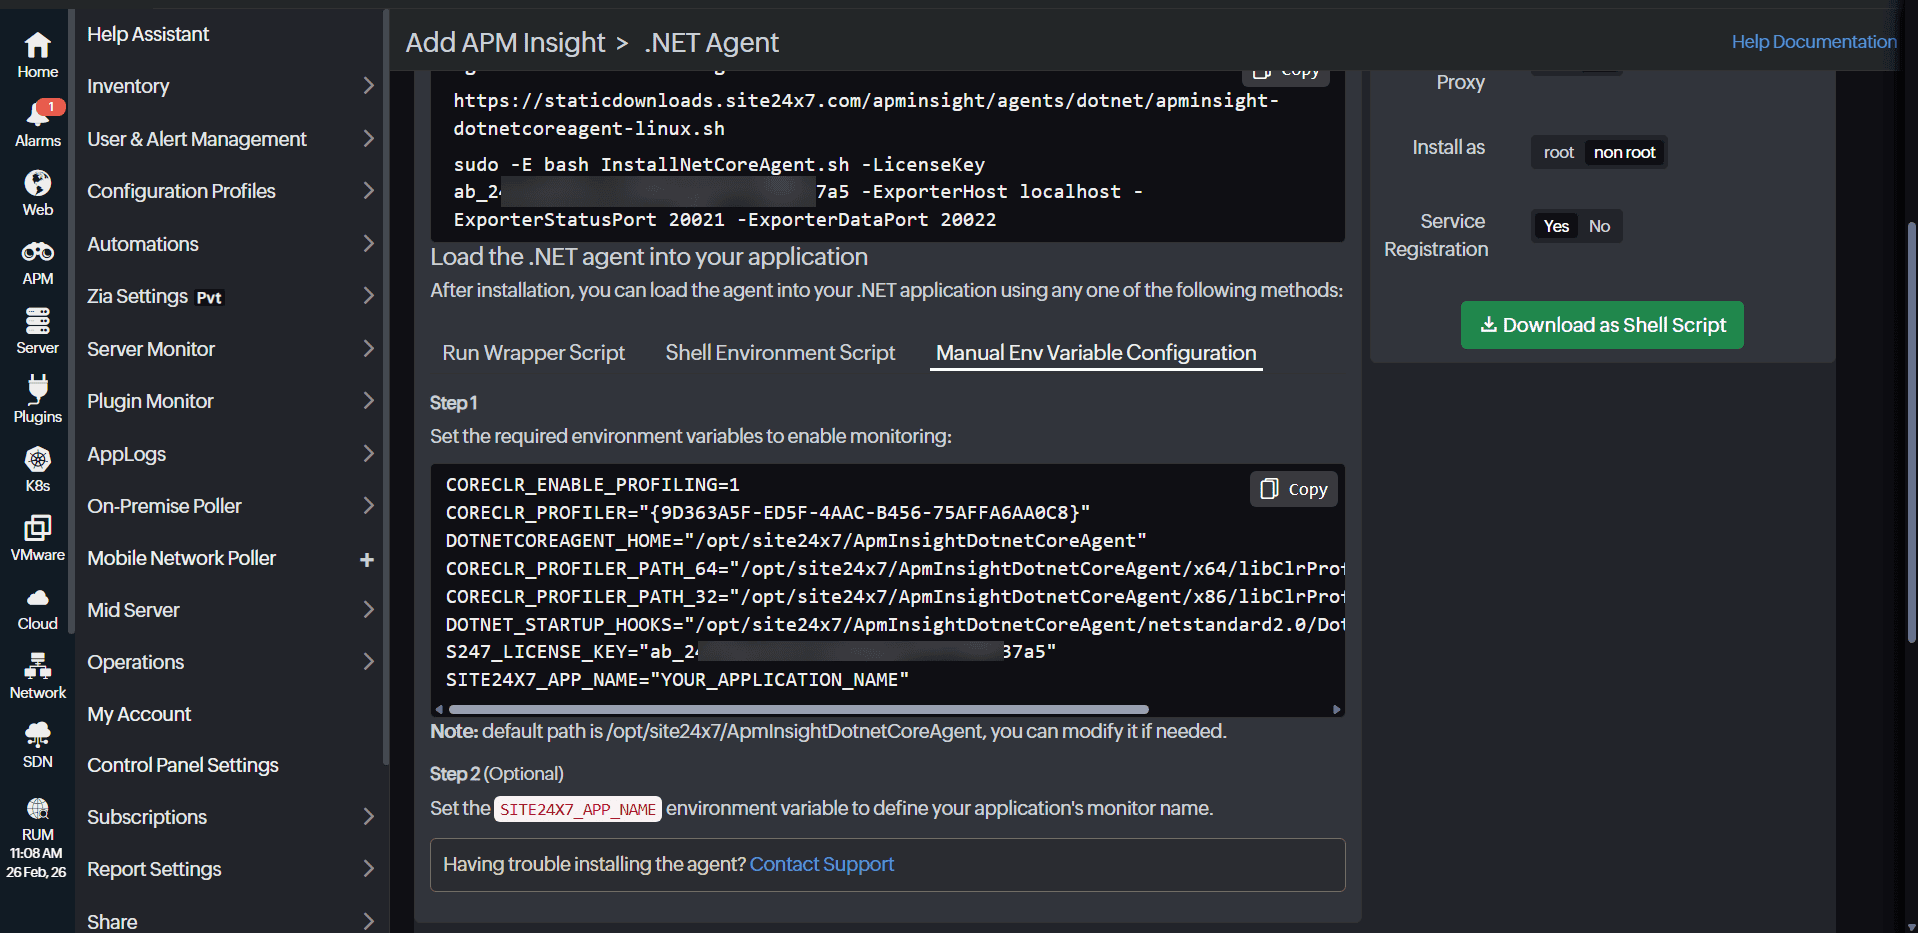
When you select the Manual Env Variable Configuration option, you can manually enable monitoring by setting the required environment variables:
CORECLR_ENABLE_PROFILING=1
CORECLR_PROFILER="{9D363A5F-ED5F-4AAC-B456-75AFFA6AA0C8}"
DOTNETCOREAGENT_HOME="/opt/site24x7/ApmInsightDotnetCoreAgent"
CORECLR_PROFILER_PATH_64="/opt/site24x7/ApmInsightDotnetCoreAgent/x64/libClrProfilerAgent.so"
CORECLR_PROFILER_PATH_32="/opt/site24x7/ApmInsightDotnetCoreAgent/x86/libClrProfilerAgent.so"
DOTNET_STARTUP_HOOKS="/opt/site24x7/ApmInsightDotnetCoreAgent/netstandard2.0/DotNetAgent.Loader.dll"
S247_LICENSE_KEY="YOUR_LICENSE_KEY"
SITE24X7_APP_NAME="YOUR_APPLICATION_NAME"
Make sure to set the SITE24X7_APP_NAME environment variable to define the monitor name for your application.
- Once the installation is complete, restart your application processes.
- Perform some transactions in your application. The metrics will then be reflected in the Site24x7 console.
Uninstalling the .NET agent in Linux
Follow the steps below to uninstall the Site24x7 .NET agent from your Linux system:
- Navigate to the agent installation directory:
/opt/site24x7/ApmInsightDotNetCoreAgent
or
<destination>/ApmInsightDotNetCoreAgent
- Locate the UninstallAgent.sh bash script.
- Run the following command to execute the uninstall script:
sudo bash UninstallAgent.sh
- Once the script finishes, the .NET agent will be successfully removed from your system.
After uninstalling the agent, restart your application to ensure the agent is entirely detached from the runtime.
Related articles